> For the complete documentation index, see [llms.txt](https://docs.archisketch.com/llms.txt). Markdown versions of documentation pages are available by appending `.md` to page URLs; this page is available as [Markdown](https://docs.archisketch.com/guide/user-en/rendershot/render-studio.md).
# Render Studio
We'll share tips for taking great render shots!
## What is Render Studio?
Render Studio is an advanced rendering workspace provided by Archisketch, where you can finely adjust various elements such as lighting, backgrounds, and cameras to create high-quality images.\
Without installing separate programs like V-Ray, anyone can easily get professional-level render shots.\
Use the intuitive interface to render from the composition you want and create realistic 3D spaces!
## Enter Render Studio
Rendering refers to an image that looks like the interior of the space you designed was photographed directly with a camera. Click the camera icon at the top of the editor page.

## Learn the panel features
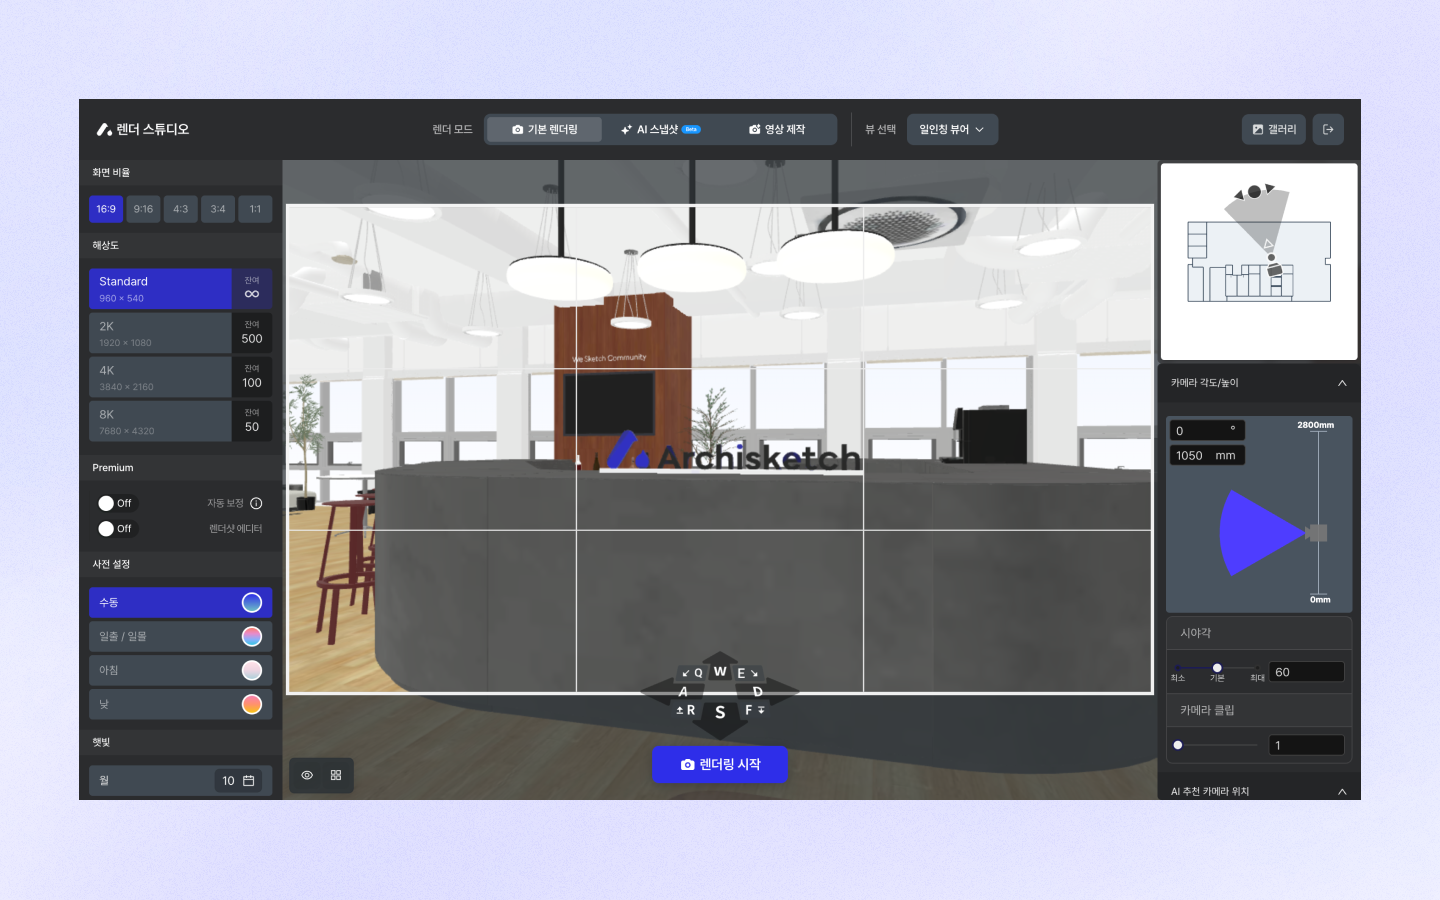
When you access Render Studio **3D space**you'll see a screen that feels like you're actually inside the space working.\
There are tabs on both sides of the screen that let you adjust the details of the rendering.\
Check out the main features.

#### 1) Detail settings
1. Aspect Ratio
1. Set the aspect ratio of the rendering screen.
2. Options: 16:9, 9:16, 4:3, 3:4, 1:1
2. Resolution
1. Set the rendering resolution.
2. Options: Standard, 2K, 4K, 8K
3. Preset
1. Adjust the intensity and angle of sunlight by selecting the time of day for the shot.
2. Options: Manual, Sunrise/Sunset, Morning, Day
4. Sunlight
1. In addition to the time-of-day setting, you can fine-tune by adjusting the month, time, intensity, and azimuth.
5. Environment settings
1. Change the color tone and brightness of the background image by adjusting the temperature and intensity.
6. Background
1. Select the background image that appears outside the window when rendering.
2. Rendering brightness is affected by the background.
7. Additional lighting
1. This is lighting installed invisibly in the ceiling, and you can change the overall brightness of the space by adjusting its intensity.
#### 2) Floor plan (minimap)
* You can check the camera (red dot) position on the floor plan and move it.
* Be careful, as rendering results may turn black if the camera is positioned inside a wall.
#### 3) Camera angle/height
* **Field of view:** Adjust with the mouse wheel; the larger the value, the more distorted the screen may become.
* **Camera clip:** A feature that cuts furniture or walls to show a cross-section.
* **AI recommended camera position:** AI suggests the optimal render shot position. (Available when room type is set)
* **Save current view:** You can save a camera position you like and reuse it later.
**Recommended camera angle and height**
* **Angle:** 0 degrees, Height: Eye level (900\~1200mm)
* **Field of view:** We recommend the default 60 degrees. If it exceeds 60 degrees, screen distortion may occur.

### 4) Shooting mode
Choose the shooting mode you want through view settings.


1. First-person viewer
* A view that feels like taking a photo inside the space
2. Isometric view
* A view looking diagonally down at the space from above
3. Plan view
* A view looking down at the floor plan from above
4. Panorama
* Creates a 360-degree rendering image, giving the feeling of looking around the entire space from a specific point.
5. By connecting multiple panorama images, you can create a 720 tour that lets users move through the space and experience it. [Learn how to create a 720 tour →](/guide/user-en/manage-project/720-tour.md)
### 5) Movement shortcuts
* **WASD/QERF** Keys let you move freely through the space and choose the shooting position.
* Click the camera icon in the minimap at the top right, then drag to move it.

After moving through the space, use the mouse or the \[Camera] tab on the right side of the screen to adjust the angle.

## Set brightness
In Archisketch, basic lighting is set up by default without any special settings, so if the space has windows and light comes in, a render shot with suitable brightness will naturally be produced.\
If you adjust the elements introduced below properly, you can complete an even more beautiful render shot.
However, there is no single correct answer!\
The factors that affect brightness are organically connected to one another, so try adjusting them to match the look you want and find your own style.
### 1) Sunlight
* **Intensity**
* If the room has no windows, sunlight won't come in, and the result may be dark.
→ In this case, increase the intensity of the additional lighting to adjust the brightness!
* Recommended intensity: 0.3\~1.0
→ The closer the intensity is to 1.0, the stronger the shadow contrast becomes.
{% hint style="danger" %}
Rendering brightness may vary depending on the size of the windows or whether curtains are present.
{% endhint %}

* **Angle**
* Try adjusting the angle of the sunlight. You can change the azimuth angle.
* Please refer to the image below for the angle.

### 2) Environment settings
1. Environment settings are related to light coming in from outside.
2. Adjustment elements:
* You can change the color tone and brightness of the background image by adjusting the temperature and intensity.
* These changes also affect the overall mood and lighting of the render shot.


**Mood changes depending on the background image**
Even with the same settings, the brightness and atmosphere of the interior can change depending on the background image!\
A dark background creates a cozy and calm feeling, while a bright background creates a lively and vibrant atmosphere.\
Choose a background that matches the mood you want! 😃

### 3) Additional lighting
**Additional lighting**is indoor lighting installed invisibly in the ceiling. It is the same as wattage (W), and the higher the intensity, the brighter the interior becomes.


You can also express different indoor lighting temperatures through preset lighting.

### 4) Installing indirect lighting
Indirect lighting is useful when basic lighting alone isn't enough!\
You can add spotlights or adjust the details of the light to create richer render shots.\
Use additional lighting to fine-tune the space more precisely!

**How to enter the indirect lighting editor**
Indirect lighting can be set in two ways:
**❶ Use manual lighting settings**
* When you click the \[Manual lighting settings] button **with no basic lighting installed in the ceiling**you can place lights directly.
* Suitable if you want to freely build lighting from scratch.
**❷ Modify preset lighting**
* When you click the edit icon **while keeping the existing additional lighting intensity**you can place additional lights.
* Use this when you want to add lights to an existing setup or make fine adjustments.
**Tips for adjusting spotlight strength**
* The **intensity**of a spotlight varies depending on the shape of the light.
* **Try different settings**to find the right intensity.
* Complete lighting that suits the space and mood!

## Create renderings
Press the render button at the bottom to render with the current settings.
* When you press the render button, you'll automatically move to the gallery, but it takes a little time for the render shot to appear.

{% hint style="info" %}
You don't have to wait in the gallery—click the \[Exit] button and render another shot, or leave Render Studio and continue other work in the editor.\
You can keep working while rendering is in progress, so you can use your time efficiently.
{% endhint %}
### How to check render shots
**Check in the gallery**
* Anywhere in Render Studio and the editor **gallery icon at the top**Click it to open the gallery.

**Check in My Projects**
* After finishing your work, save the project and exit. You can view the render shots you captured anytime in the \[My Projects > Project > Render Shots] tab.

* If the render shot is not finished yet, a screen showing rendering in progress will appear.\
When rendering is complete, you'll be notified through a dashboard alert.

### Render with the same settings
If you want to reuse a composition you captured before, use the \[Render with the Same Settings] feature.
**How to use**
* In the editor, press the render button to move to the gallery.
* Select the render shot of the composition you want to shoot again.
* Click the \[Render with the Same Settings] button that appears on the right side of the screen, and the settings for that render shot will be applied automatically.

## Frequently Asked Questions
#### How long does it take to render one image?
* The higher the resolution and the more furniture placed, the longer the rendering computation time.
* Archisketch processes rendering using cloud servers.\
Because of this, the time it takes for the result to arrive may vary depending on user traffic, and since it is processed sequentially, there may be time differences.
* If no result appears even after more than 30 minutes, it may be an error, so please contact Archisketch.\
We'll check whether there is an issue.
#### The render shot is too bright.
If the background image is set to None, or if the space has large windows, there may be a lot of light and the render shot can come out bright.
* Try lowering the environment setting intensity.
* Try changing the background image to a different one.
#### The render shot comes out black.
The camera may be slightly overlapping with a wall.
* Check the camera (red dot) position in the Render Studio minimap, move it slightly away from the wall, and try rendering again.
#### When I rendered, the floor finish came out strangely.
If you rendered with the wall height lowered, the ceiling surface may cover the floor surface, so the original floor finish may not be visible.
* If you render while the \[Hide Ceiling] option is checked in the editor, it will work properly.
---
# Agent Instructions
This documentation is published with GitBook. GitBook is the documentation platform designed so that both humans and AI agents can read, navigate, and reason over technical content effectively. Learn more at gitbook.com.
## Querying This Documentation
If you need additional information that is not directly available in this page, you can query the documentation by asking a question.
Perform an HTTP GET request on the following URL with the `ask` and `goal` query parameters:
```
GET https://docs.archisketch.com/guide/user-en/rendershot/render-studio.md?ask=&goal=
```
`ask` is the immediate question: it should be specific, self-contained, and written in natural language.
`goal` is what the user is ultimately trying to achieve, the reason they need the answer. Sharing it helps GitBook give you a better, more relevant answer. A goal is most helpful when it describes the outcome the user wants rather than restating the question. For example, with `ask=how do I create an API token`, a goal like `automate deployments from our CI pipeline` lets GitBook tailor the answer to that use case.
The response will contain a direct answer to the question and relevant excerpts and sources from the documentation.
Use this mechanism when the answer is not explicitly present in the current page, you need clarification or additional context, or you want to retrieve related documentation sections.