> For the complete documentation index, see [llms.txt](https://docs.archisketch.com/llms.txt). Markdown versions of documentation pages are available by appending `.md` to page URLs; this page is available as [Markdown](https://docs.archisketch.com/guide/user-en/make-project/editor-modes.md).
# Learn about Editor mode
Before placing furniture! We'll introduce the Editor mode information you should know first.
## Switching between 2D / 3D modes
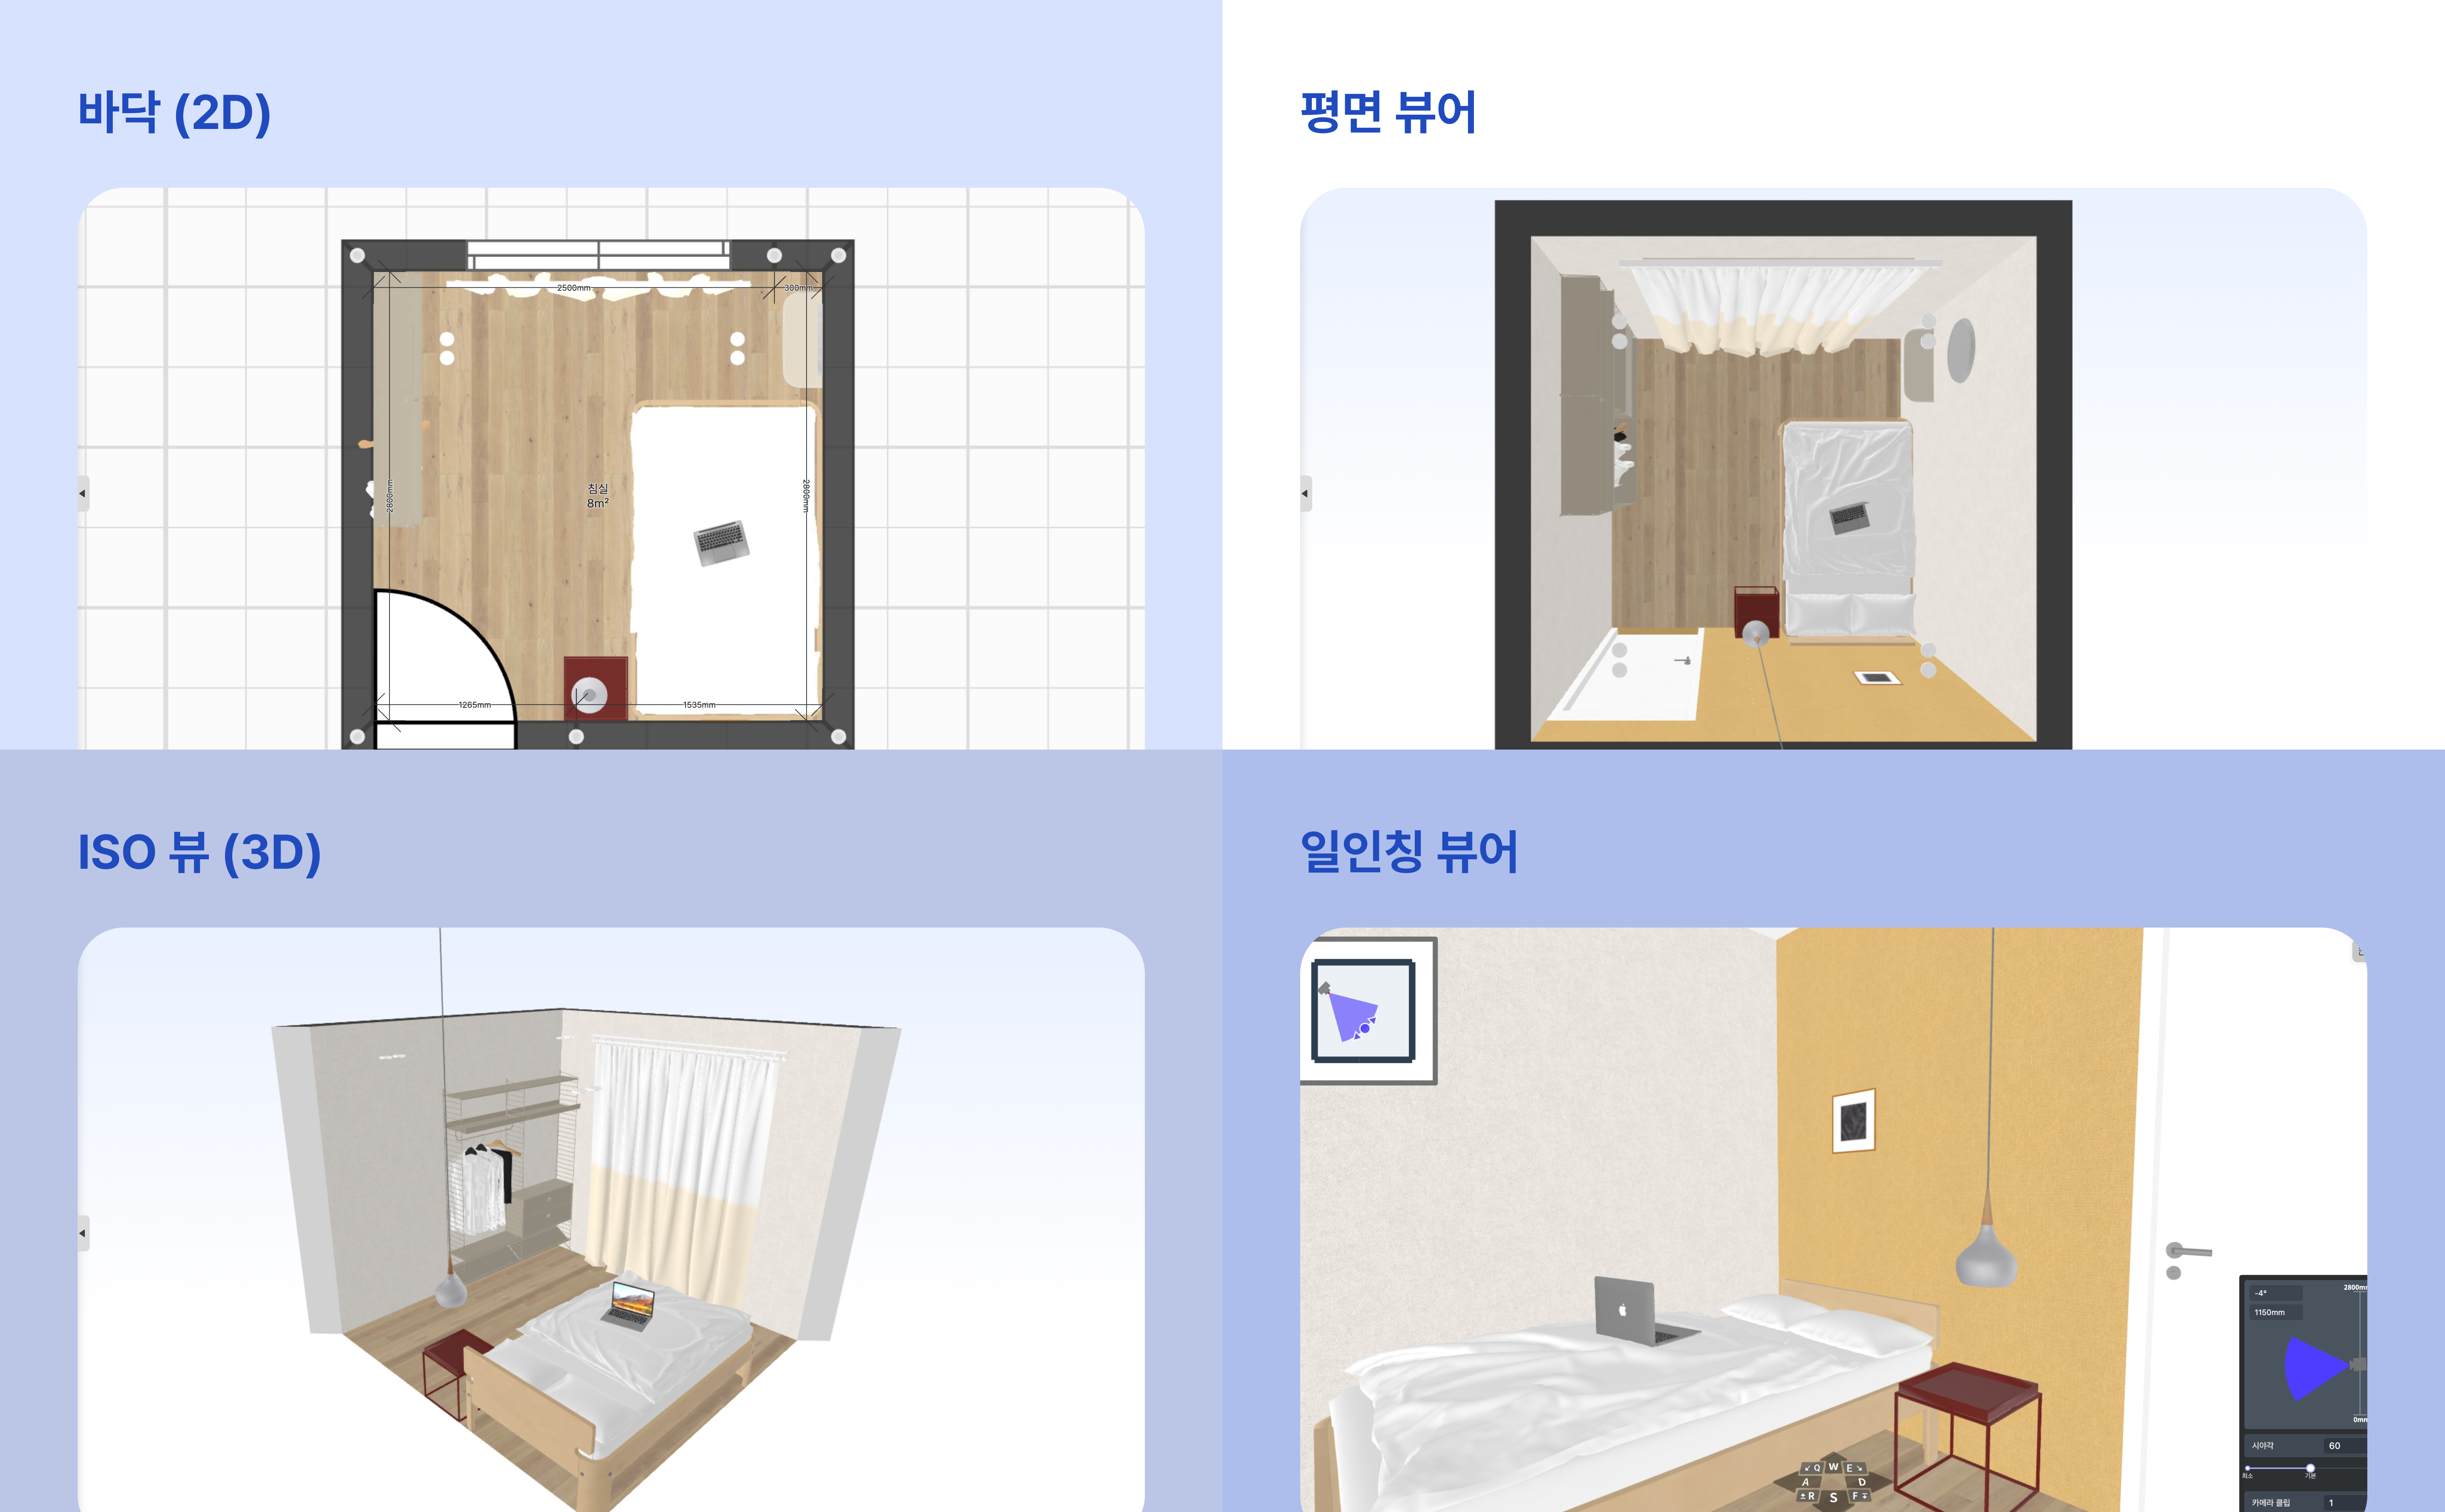
The editor provides four viewer modes.\
You’ll use the floor (2D) and ISO view (3D) the most, so be sure to memorize the shortcuts!

#### Floor (2D mode)
: This mode lets you view the drawing in 2D plan view.\
It’s useful for placing, copying, moving furniture, or setting up layouts.\
It also displays dimension information, so you can check distances between furniture or between walls and furniture at a glance, which is a big help when arranging layouts.
#### Plan view
: This mode lets you view the entire space from above.\
It gives you a three-dimensional sense of the space, making it easier to understand the placement and structure of furniture more clearly.
#### ISO View (3D mode)
: This mode lets you view products three-dimensionally using an isometric view in 3D mode.\
You can check the front, side, and top of a product at the same time, making it easier to fine-tune furniture placement and design.\
In particular, this mode is often used when moving products up and down or placing finishes on walls.
#### First-person viewer
: This mode lets you explore the space from a first-person perspective.\
As if you were actually in the space, you can experience the interior design and inspect details directly.\
However, in first-person viewer mode, you cannot place or edit products; only viewer functions are provided.
Shortcut
| Name | Shortcut |
| ----------------------- | -------- |
| **Floor (2D mode)** | 1 |
| **Plan view** | 2 |
| **ISO View (3D mode)** | 3 |
| **First-person viewer** | 4 |
## 2D view mode settings
The view mode icon at the bottom of the editor also has various buttons.\
You can turn features on and off, and using them appropriately can be a big help in your work. Shall we take a look one by one?
#### View mode
* Grid: You can turn the grid pattern displayed in the background on or off.
* Guide lines: You can show or hide guide lines added while drawing.
* Floor furniture: You can toggle all furniture with the position property set to the floor on or off at once.
* Wall furniture: You can toggle all furniture with the position property set to the wall on or off at once.
* Ceiling furniture: You can toggle all furniture with the position property set to the ceiling on or off at once.
* Architecture/Materials: You can easily toggle structures created with the architecture/materials editor on or off.

#### Room view
* Space name: The room type or a name you set manually is displayed.
* Space area: The area is automatically calculated and displayed on the 2D drawing.

#### Dimension line view
* Inner wall dimension reference: By default, inner wall dimensions are displayed. You can check the exact dimensions between walls.
* Hide dimension lines: If you don't need dimension lines, you can hide them by selecting Hide dimension lines. Useful when creating a clean drawing.

#### Measurement lines
* You can show or hide measurement lines added using the measurement function from the wrench-shaped icon at the top of the editor.

## 3D mode settings
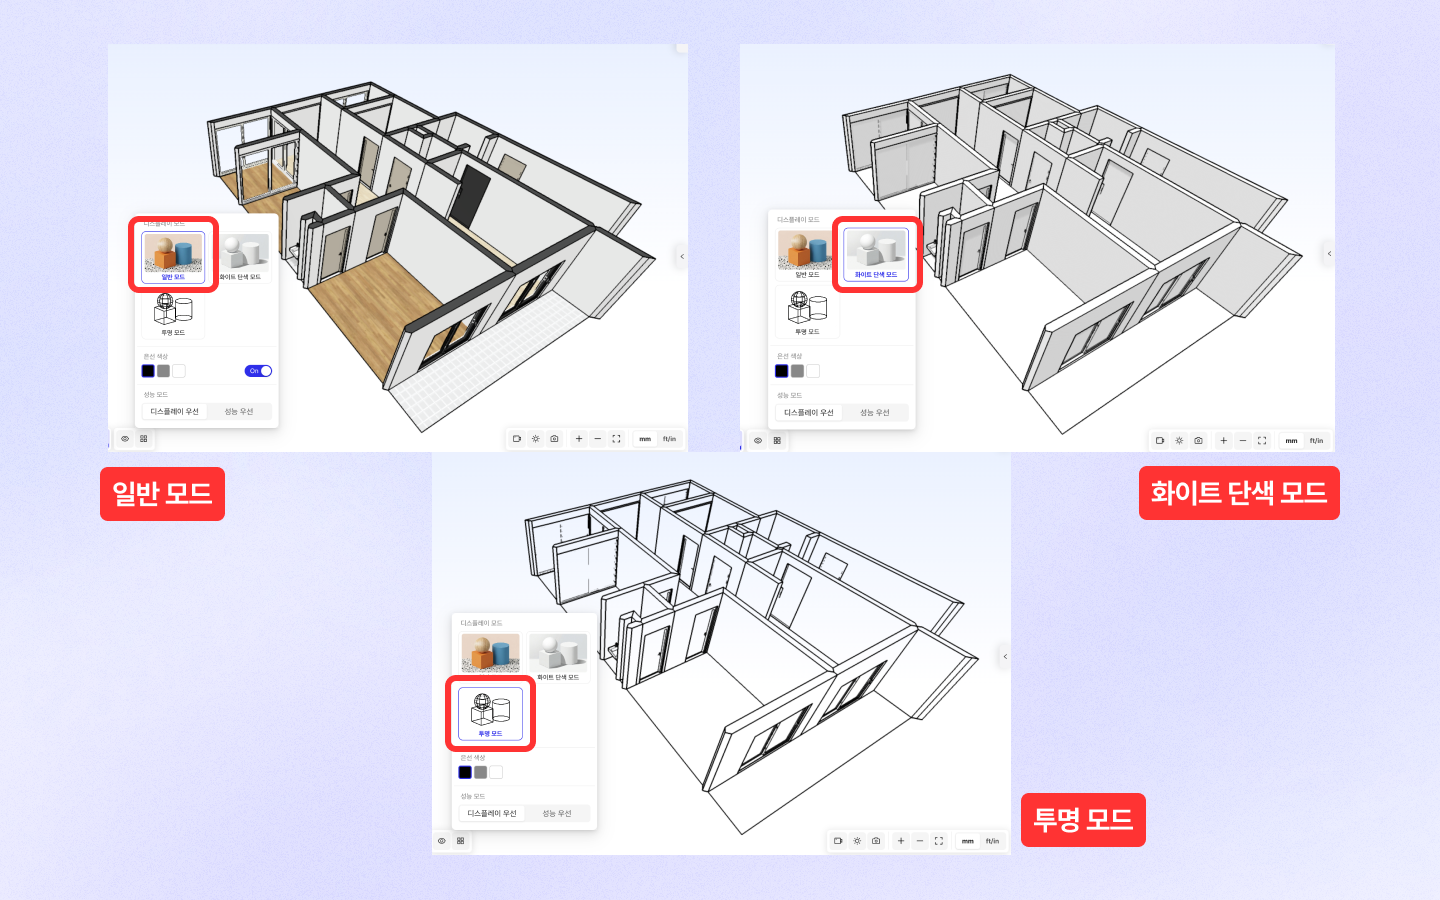
### Display mode
Archisketch offers four display modes.\
Using these modes makes it easy to check a product’s exact outline, which is useful for more detailed work.\
The modes are as follows.
* Normal mode: Products are displayed with their colors and textures by default. Use this in a general working environment.
* Wireframe mode: This mode shows only the product’s outline, making it easier to accurately understand the product’s shape, which is useful for placement and alignment.
* Material + Wireframe mode: This mode emphasizes and displays product details.\
Use it when examining areas that require textures or details.
* Transparent wireframe mode: In 3D view, you can better see the depth and dimensionality of a product.
### Performance mode
\[Display First] and \[Performance First] are two modes in the Archisketch editor that optimize the display.\
Each mode configures the user's workspace differently, prioritizing either how the screen is displayed or performance.
* Display First: Elements shown on the screen appear clear and detailed.\
It’s useful when visual quality matters, but it may be somewhat slow with complex models.
* Performance First: Simplifies screen display to provide faster response speed.\
Performance is smoother when working on complex tasks, but visual quality may be slightly reduced.

### Camera settings
Click the camera-shaped icon at the bottom right of the editor to set the camera position, azimuth, and field of view in 3D mode.

* Perspective: With camera elevation 35°, azimuth 47°, and field of view 60°, depth and perspective are naturally expressed in the space.\
You can check a realistic sense of space similar to what you see with your own eyes.
* Orthographic: You can accurately understand the structure and proportions of a space without perspective distortion.\
This view is useful when objectively reviewing furniture placement or space dimensions.
### Sunlight
Sunlight is applied by clicking the sunlight-shaped icon at the bottom right of the editor.\
Clicking this icon creates the effect of actual sunlight coming in, allowing you to view the model more realistically.
* Sunlight settings are also linked with Render Studio, so the applied settings are reflected during rendering as well.

## Other functions
### Lock drawing (2D mode)
After finishing the drawing, this function locks the drawing’s walls so they don't move when you decorate the plan by placing furniture or finishes.\
Using this function lets you safely place other elements without accidentally changing the walls.

{% hint style="info" %}
If you try to modify a wall during work but it doesn't move, check whether 'Lock drawing' is enabled!
{% endhint %}
### Screen capture
A function that lets you easily download the editor screen as an image file. Available in both 2D / 3D modes.
**In 2D mode**
* The entire drawing is automatically adjusted to fit.
* Dimensions and room names are excluded.
* The result is downloaded in PNG format.
**In 3D mode**
* It captures exactly the view currently displayed on the screen.
* Downloaded in PNG format.

### Zoom in / out / fit to screen
If you want to zoom in or out without using the mouse wheel, please use this function.

❶ Zoom in: The editor screen zooms in.
❷ Zoom out: The editor screen zooms out.
❸ Fit to screen: The drawing is automatically adjusted to fit the screen.
### Dimension units
You can convert and view dimension units in \[mm] and \[ft/in].

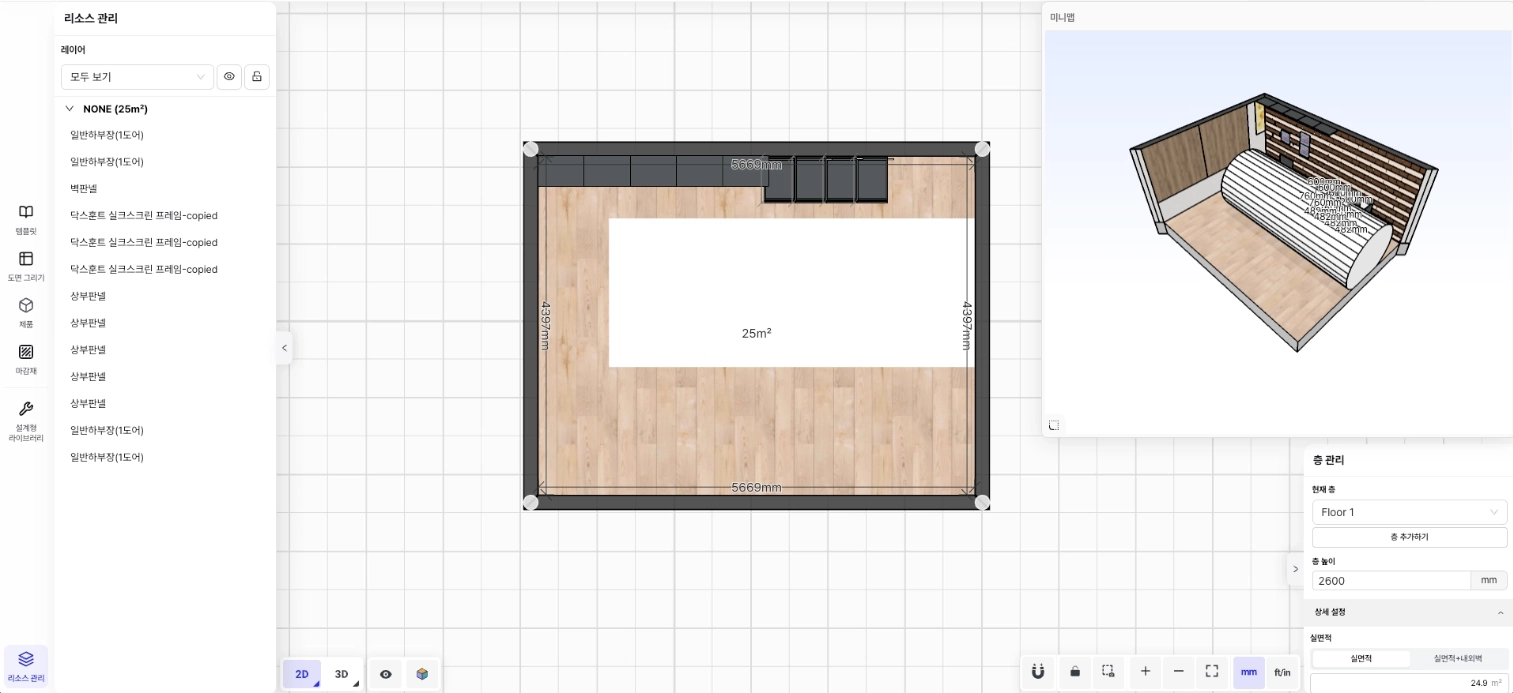
### Moving around the drawing with the minimap
The entire drawing **minimap**lets you see everything at a glance. When working on large drawings, you can quickly identify your current position and move to where you want.
**Features**
* Drag the handle at the bottom left **to adjust the minimap size**You can.
* **The 2D/3D drawing editor, as well as the ceiling, finish, and parametric editors**can also be used the same way.
{% hint style="info" %}
**Pro tip** — On large floor plans or drawings with multiple spaces, keeping the minimap enlarged greatly reduces the hassle of moving around the screen.
{% endhint %}
---
# Agent Instructions
This documentation is published with GitBook. GitBook is the documentation platform designed so that both humans and AI agents can read, navigate, and reason over technical content effectively. Learn more at gitbook.com.
## Querying This Documentation
If you need additional information that is not directly available in this page, you can query the documentation by asking a question.
Perform an HTTP GET request on the following URL with the `ask` and `goal` query parameters:
```
GET https://docs.archisketch.com/guide/user-en/make-project/editor-modes.md?ask=&goal=
```
`ask` is the immediate question: it should be specific, self-contained, and written in natural language.
`goal` is what the user is ultimately trying to achieve, the reason they need the answer. Sharing it helps GitBook give you a better, more relevant answer. A goal is most helpful when it describes the outcome the user wants rather than restating the question. For example, with `ask=how do I create an API token`, a goal like `automate deployments from our CI pipeline` lets GitBook tailor the answer to that use case.
The response will contain a direct answer to the question and relevant excerpts and sources from the documentation.
Use this mechanism when the answer is not explicitly present in the current page, you need clarification or additional context, or you want to retrieve related documentation sections.