> For the complete documentation index, see [llms.txt](https://docs.archisketch.com/llms.txt). Markdown versions of documentation pages are available by appending `.md` to page URLs; this page is available as [Markdown](https://docs.archisketch.com/guide/user-en/get-started/undefined.md).

# Using it on a Tablet

We’ll walk you through how to do everything from importing floor plans to placing furniture, selecting finishes, rendering, and estimating, all with just a few taps on a tablet.

> **Overall flow** — Load floor plans → place furniture → compare finishes → render shots → (quote). You can show what you're curious about right then and there. (In a showroom consultation, you can show it the moment the customer asks and even hand over a quote on the spot.)

**What you can do with this guide**

* Find and load the floor plan of a customer's home (or your own space) by address
* Use touch to place and rotate furniture, and instantly change and compare finishes and colors
* Create and save realistic rendered images
* (Sales·B2B) Create and export quotes in real time

Below **In order from 1 to 9** If you follow along, you can finish without getting stuck, even the first time. You can also choose only the steps you need.

{% hint style="success" %}
If it's your first time, try following along slowly, one step at a time. Once you complete it all the way through just once, it'll be much faster from then on.
{% endhint %}

***

### 1. Before you start

* **What you need** — A tablet (iPad, etc.), an Archisketch account, and an internet connection. The larger the tablet screen, the easier it is to see.
* **Log in** — If you access Archisketch in a tablet browser and log in, you'll see the same projects as on PC.
* **Why a tablet?** — You're not tied to a PC, so you can view the screen and place and edit things right away from anywhere.

{% hint style="info" %}
It includes controls optimized for touch devices, so you can draw floor plans and place furniture without a mouse.
{% endhint %}

### 2. Exploring the home screen

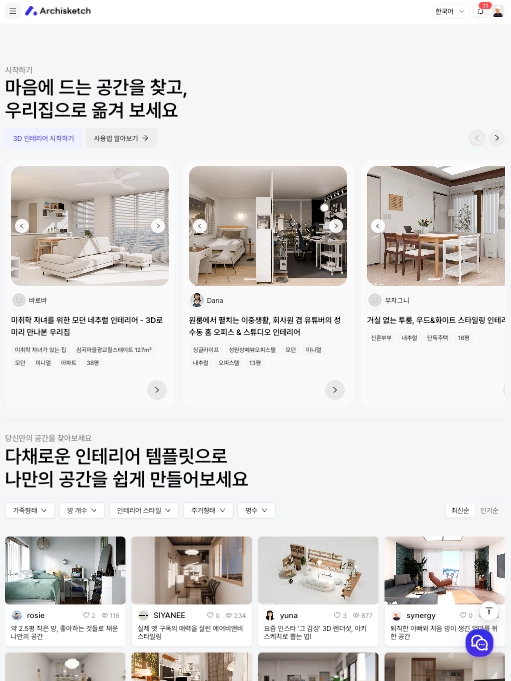
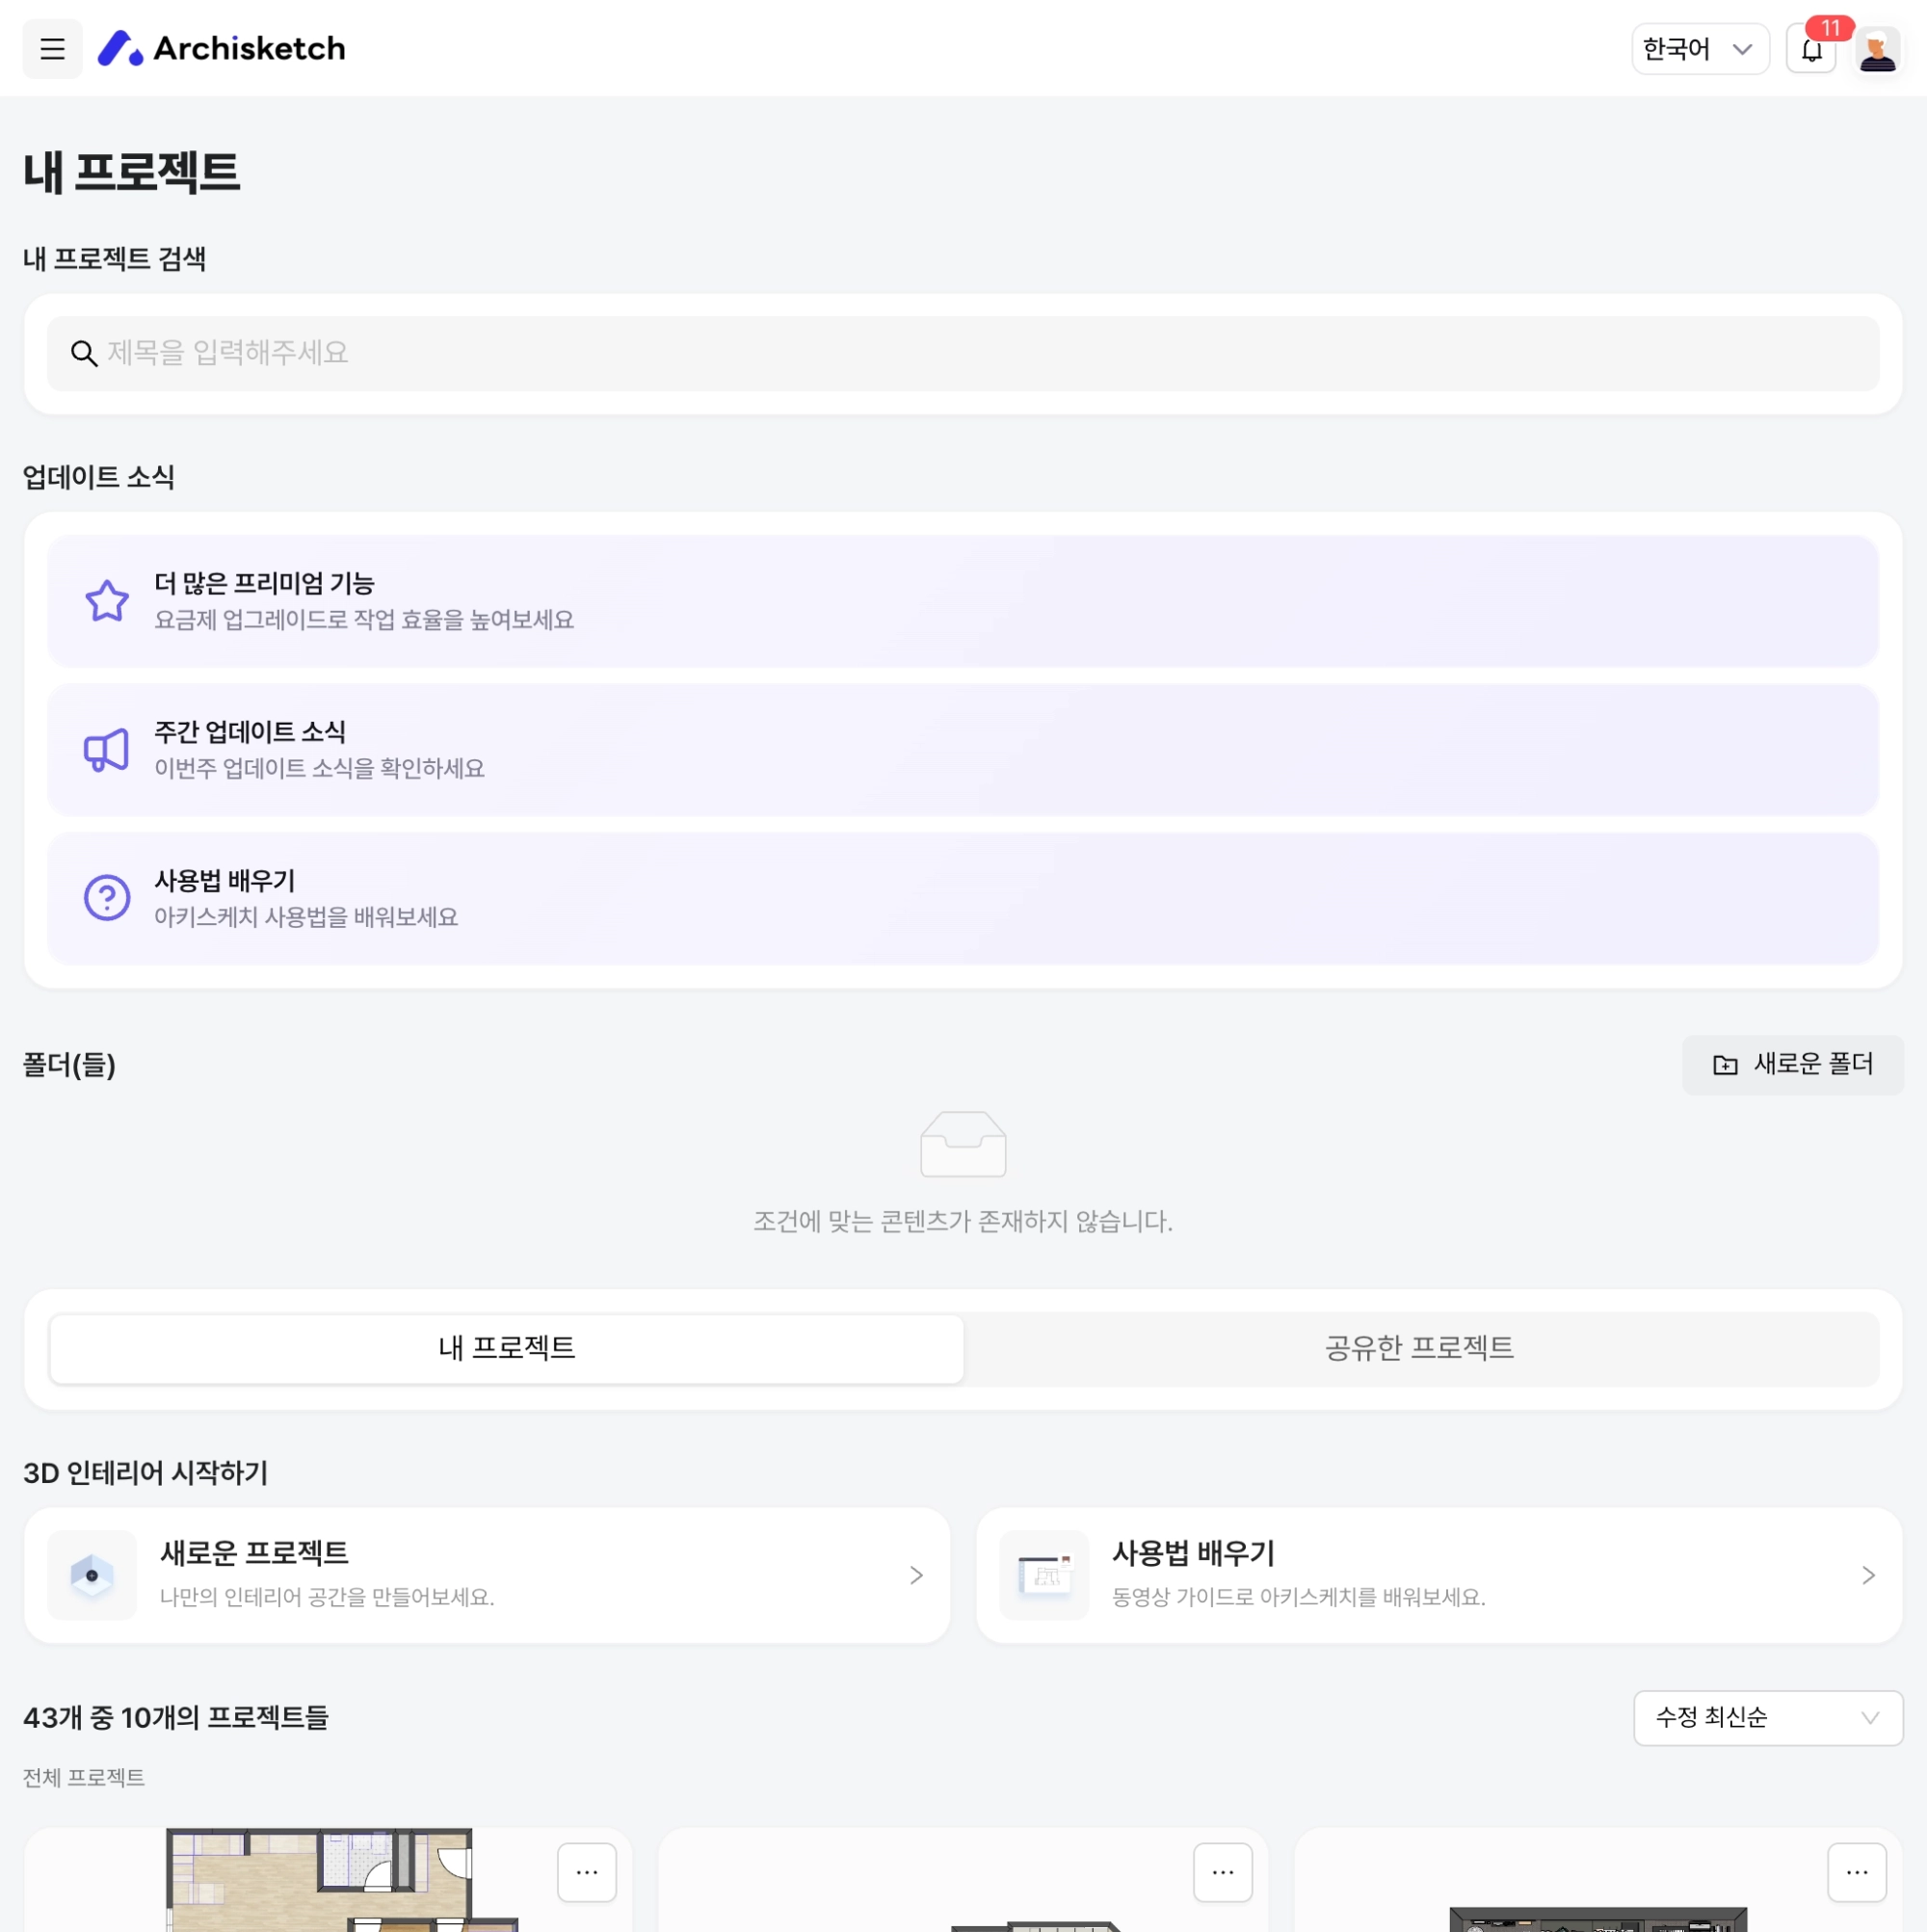
This is the first screen you see after logging in.

<figure><img src="https://1040484064-files.gitbook.io/~/files/v0/b/gitbook-x-prod.appspot.com/o/spaces%2Fs45pRyTQeyYi0T0toKii%2Fuploads%2Fgit-blob-f30604d9d75313e6628a642ec5715866a387f4e9%2Fundefined-1.png?alt=media" alt=""><figcaption></figcaption></figure>

* **Start 3D interior design → New project** — When creating a new space from scratch.
* **Learn how to use it** — You can learn the basics with video guides.
* In the top right **language (Korean) and notifications**can be checked.

### 3. Starting a project & finding a floor plan

The starting point of the work is the floor plan. If you know the address, you can find and load that home's floor plan.

{% stepper %}
{% step %}

### **Start a new project**

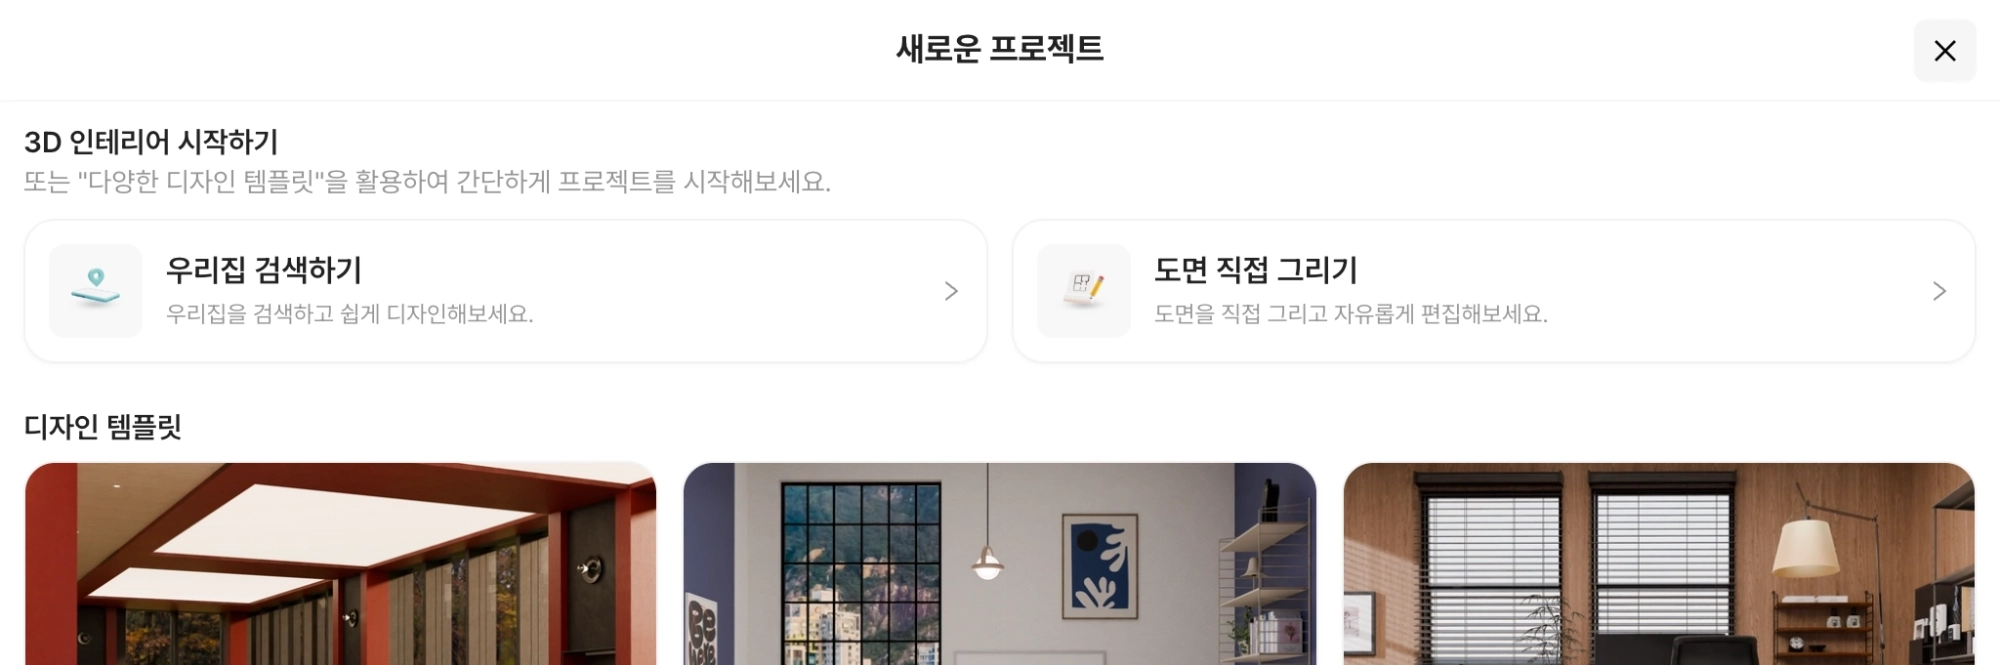
Press New Project to begin.

<figure><img src="https://1040484064-files.gitbook.io/~/files/v0/b/gitbook-x-prod.appspot.com/o/spaces%2Fs45pRyTQeyYi0T0toKii%2Fuploads%2Fgit-blob-c2186150eeb471c325135b8b32965c6f1046f653%2Fundefined-2.png?alt=media" alt=""><figcaption></figcaption></figure>

Search for your home, or draw a floor plan yourself to create an editor.

<figure><img src="https://1040484064-files.gitbook.io/~/files/v0/b/gitbook-x-prod.appspot.com/o/spaces%2Fs45pRyTQeyYi0T0toKii%2Fuploads%2Fgit-blob-08a1488f3ede0ae106bef6ed4b90c3386dc3a023%2Fundefined-3.png?alt=media" alt=""><figcaption></figcaption></figure>
{% endstep %}

{% step %}

### **Search for an address/building on the map**

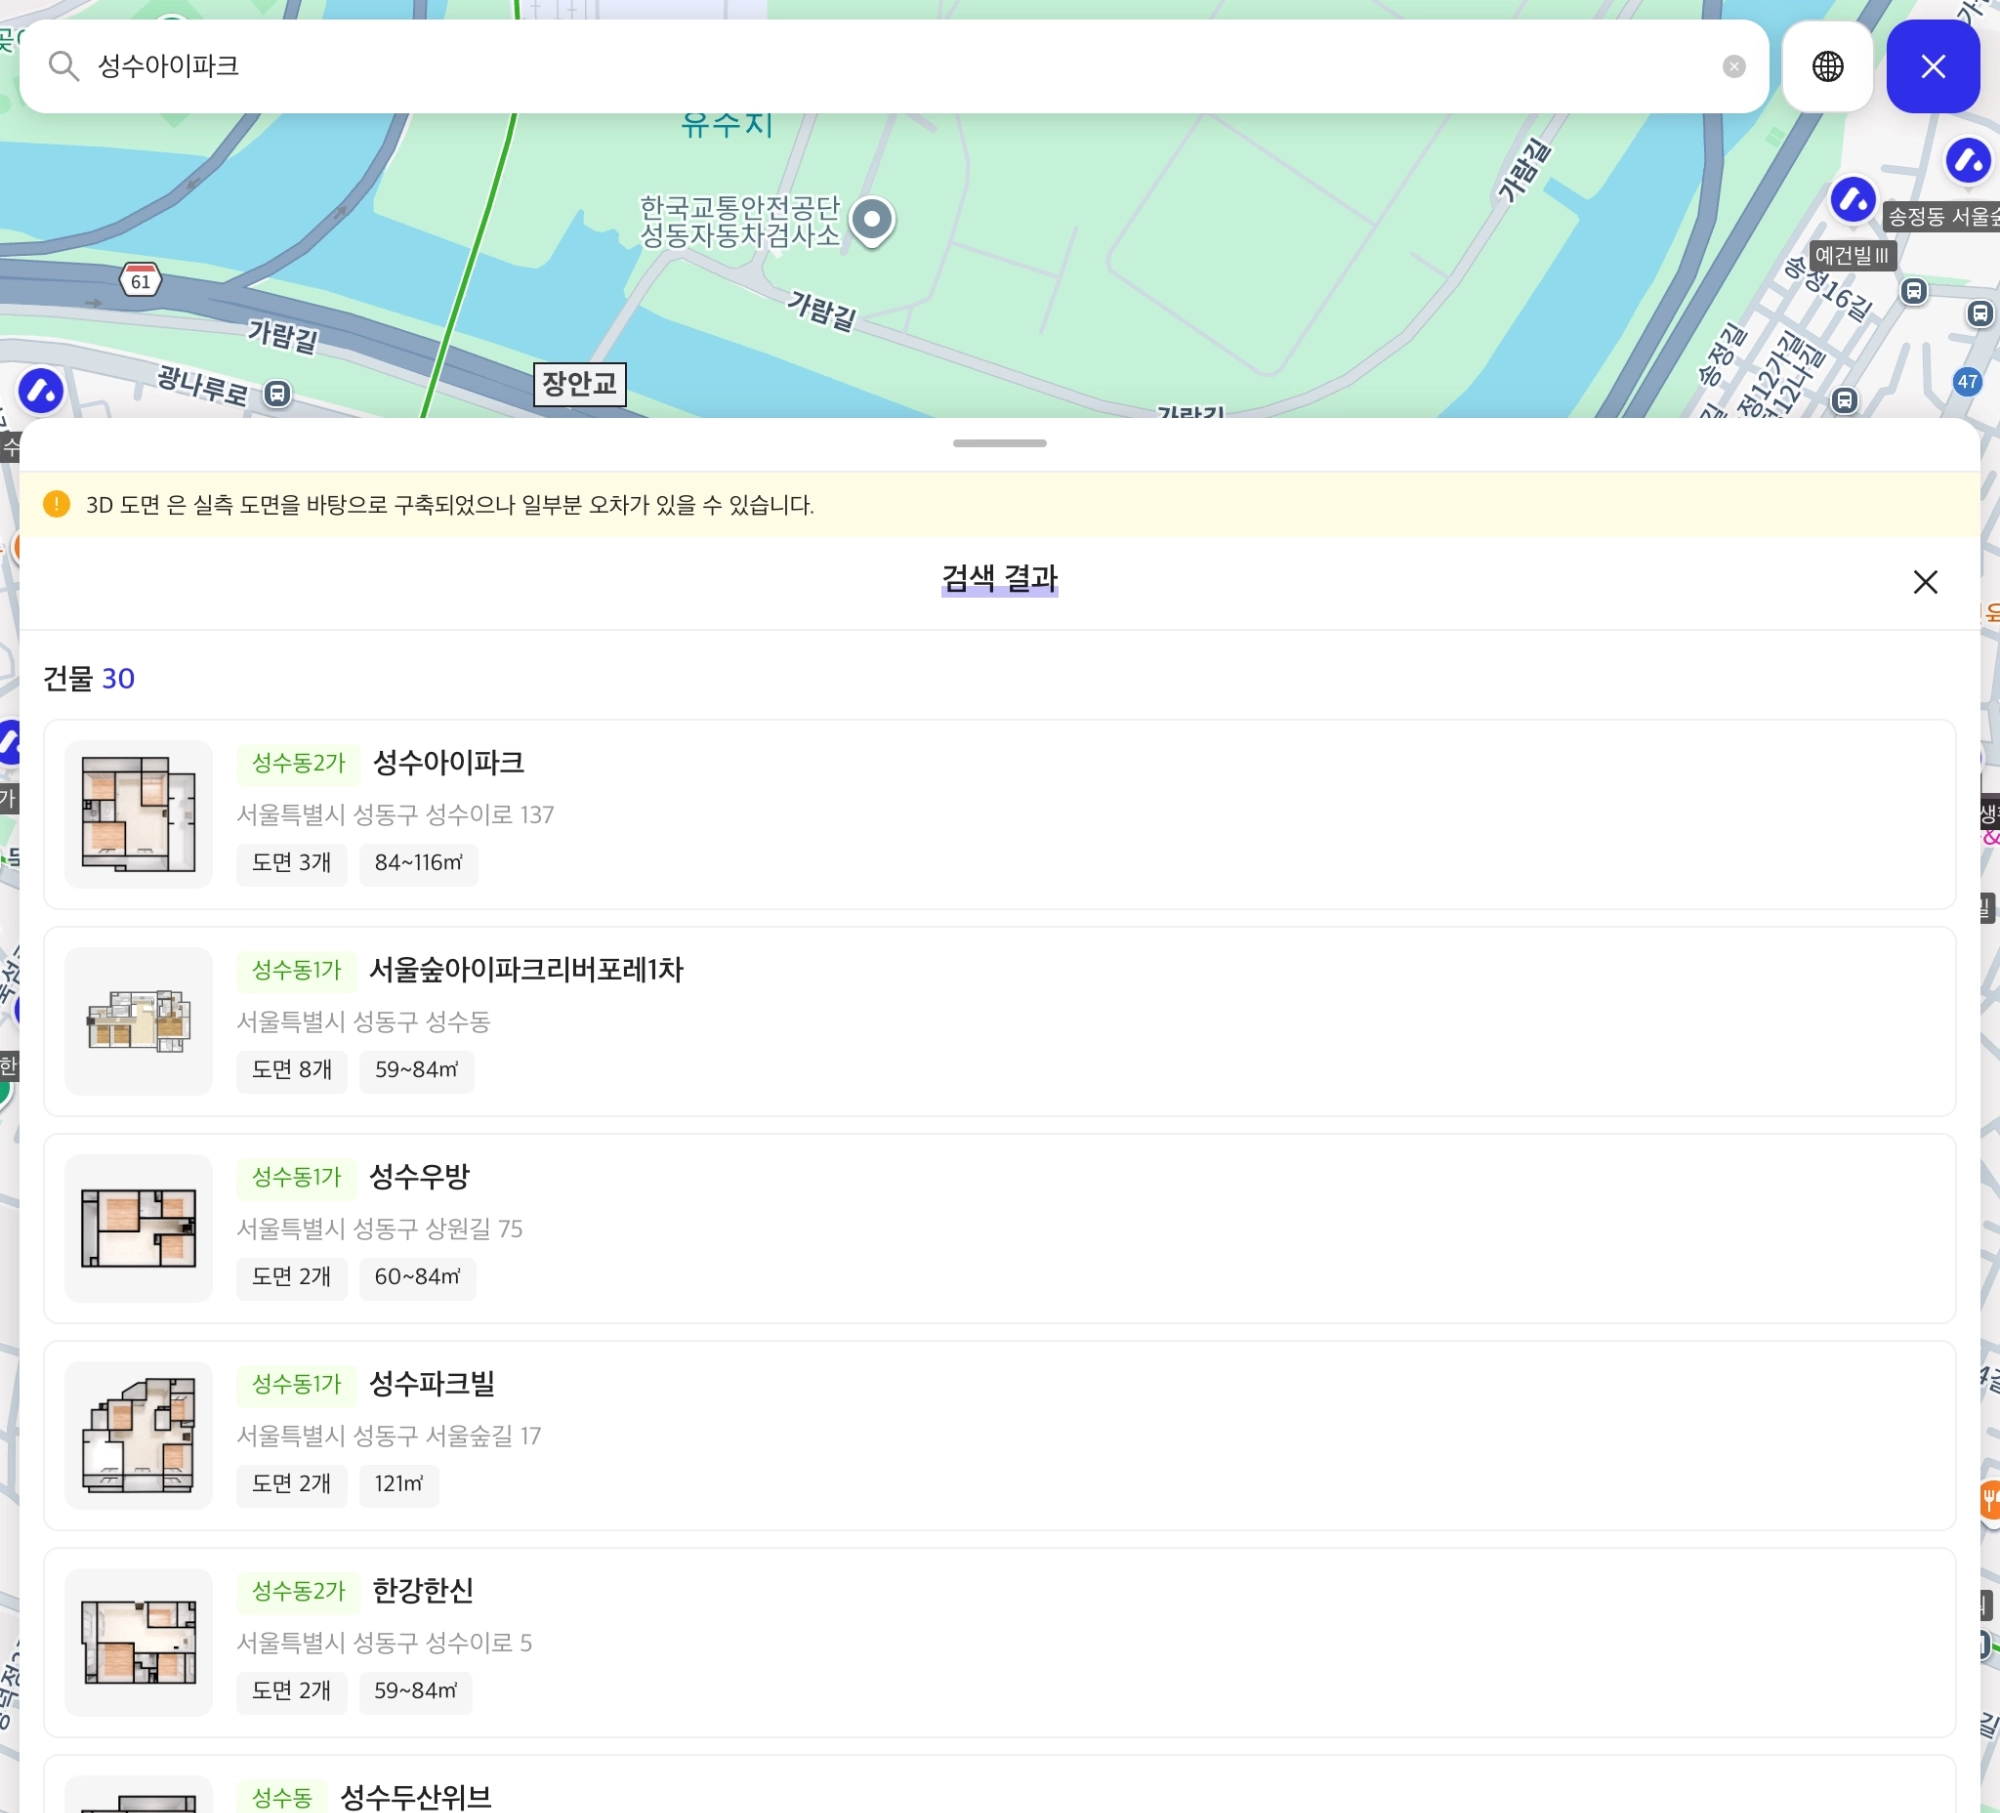
Enter an address to find the building.

<figure><img src="https://1040484064-files.gitbook.io/~/files/v0/b/gitbook-x-prod.appspot.com/o/spaces%2Fs45pRyTQeyYi0T0toKii%2Fuploads%2Fgit-blob-03a9ff8169a4596c8d83b46fab47fe168312bb3b%2Fundefined-4.png?alt=media" alt=""><figcaption></figcaption></figure>
{% endstep %}

{% step %}

### Choose a floor plan

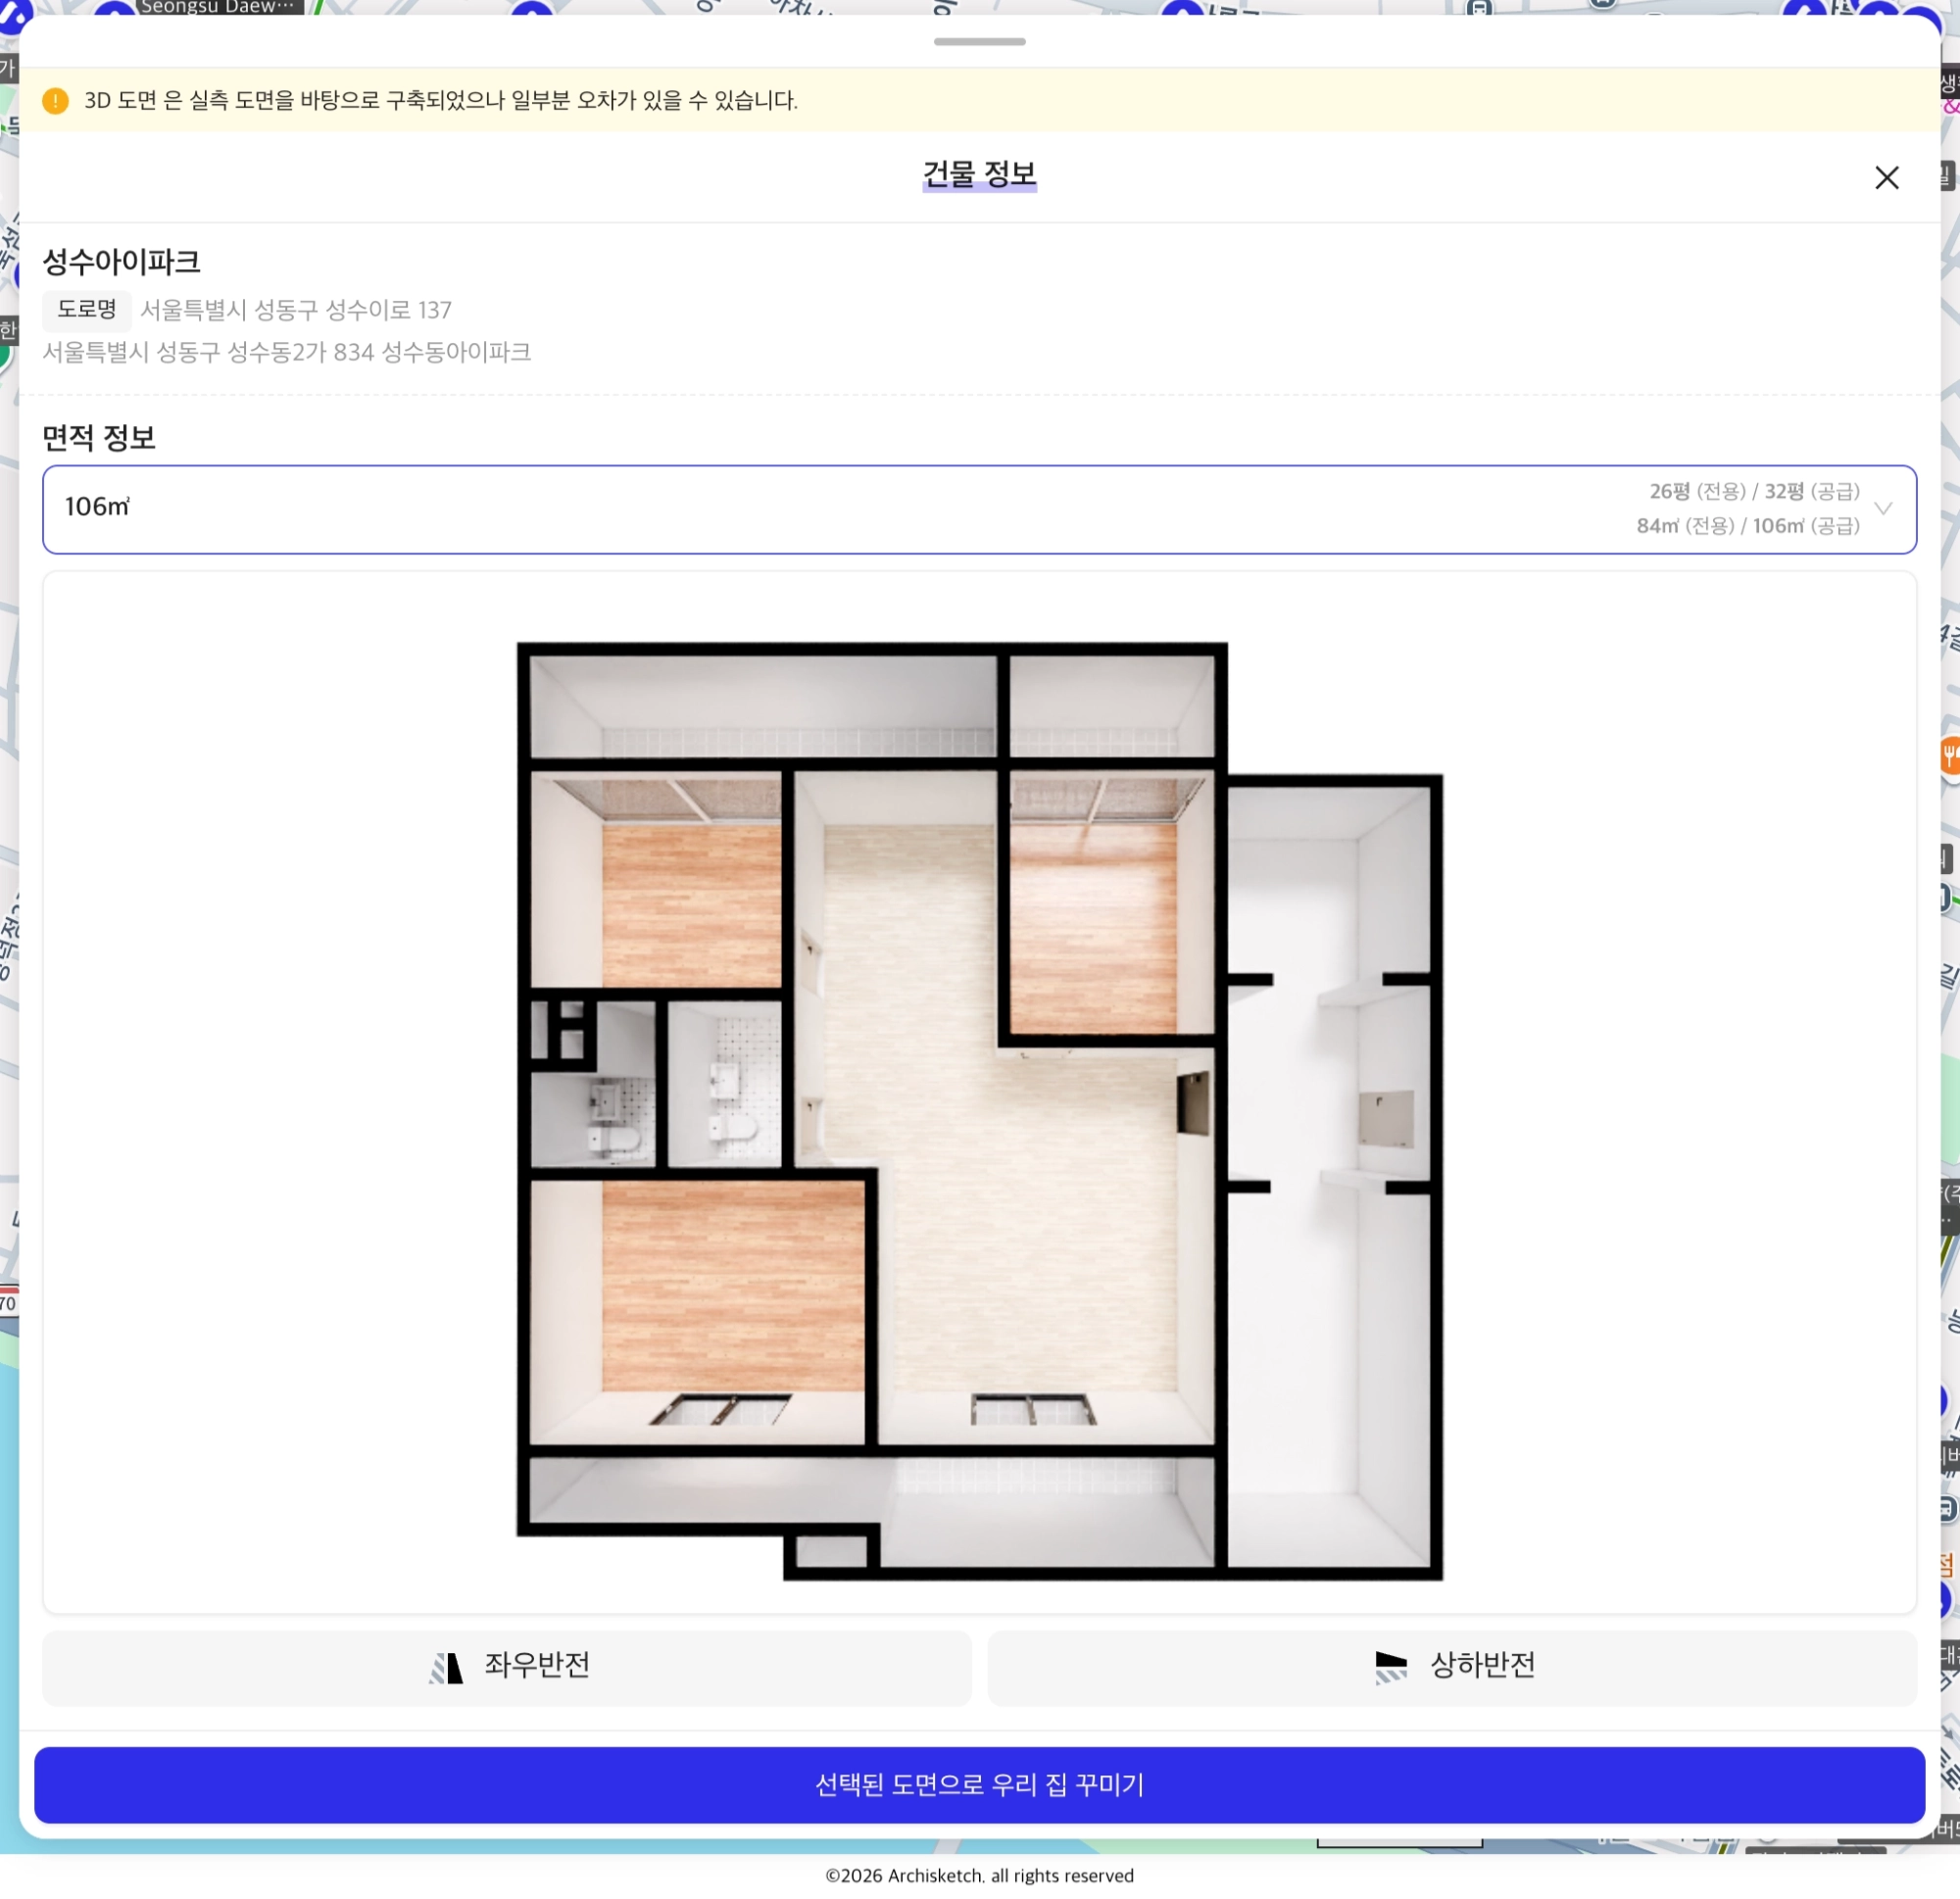
When you select a building, available floor plans (images, address, number of floor plans) appear.

Choose the correct floor plan (if needed, adjust the orientation with horizontal flip or vertical flip) below **\[Decorate my home with the selected floor plan]**&#x50;ress it to open it as a new project.

<figure><img src="https://1040484064-files.gitbook.io/~/files/v0/b/gitbook-x-prod.appspot.com/o/spaces%2Fs45pRyTQeyYi0T0toKii%2Fuploads%2Fgit-blob-1aabacdba7029874fd4fbb8c16f9994cf525a465%2Fundefined-5.png?alt=media" alt=""><figcaption><p>▲ After selecting a floor plan, press [Decorate my home with the selected floor plan] to open a new project.</p></figcaption></figure>

{% hint style="info" %}
So it's easy to find even on a small screen **Floating search + bottom panel**is organized that way.

If you can't find the floor plan, you can start by drawing it yourself (chapters 4 and 5).
{% endhint %}
{% endstep %}
{% endstepper %}

### 4. Understanding the screen and views (2D·3D·viewer)

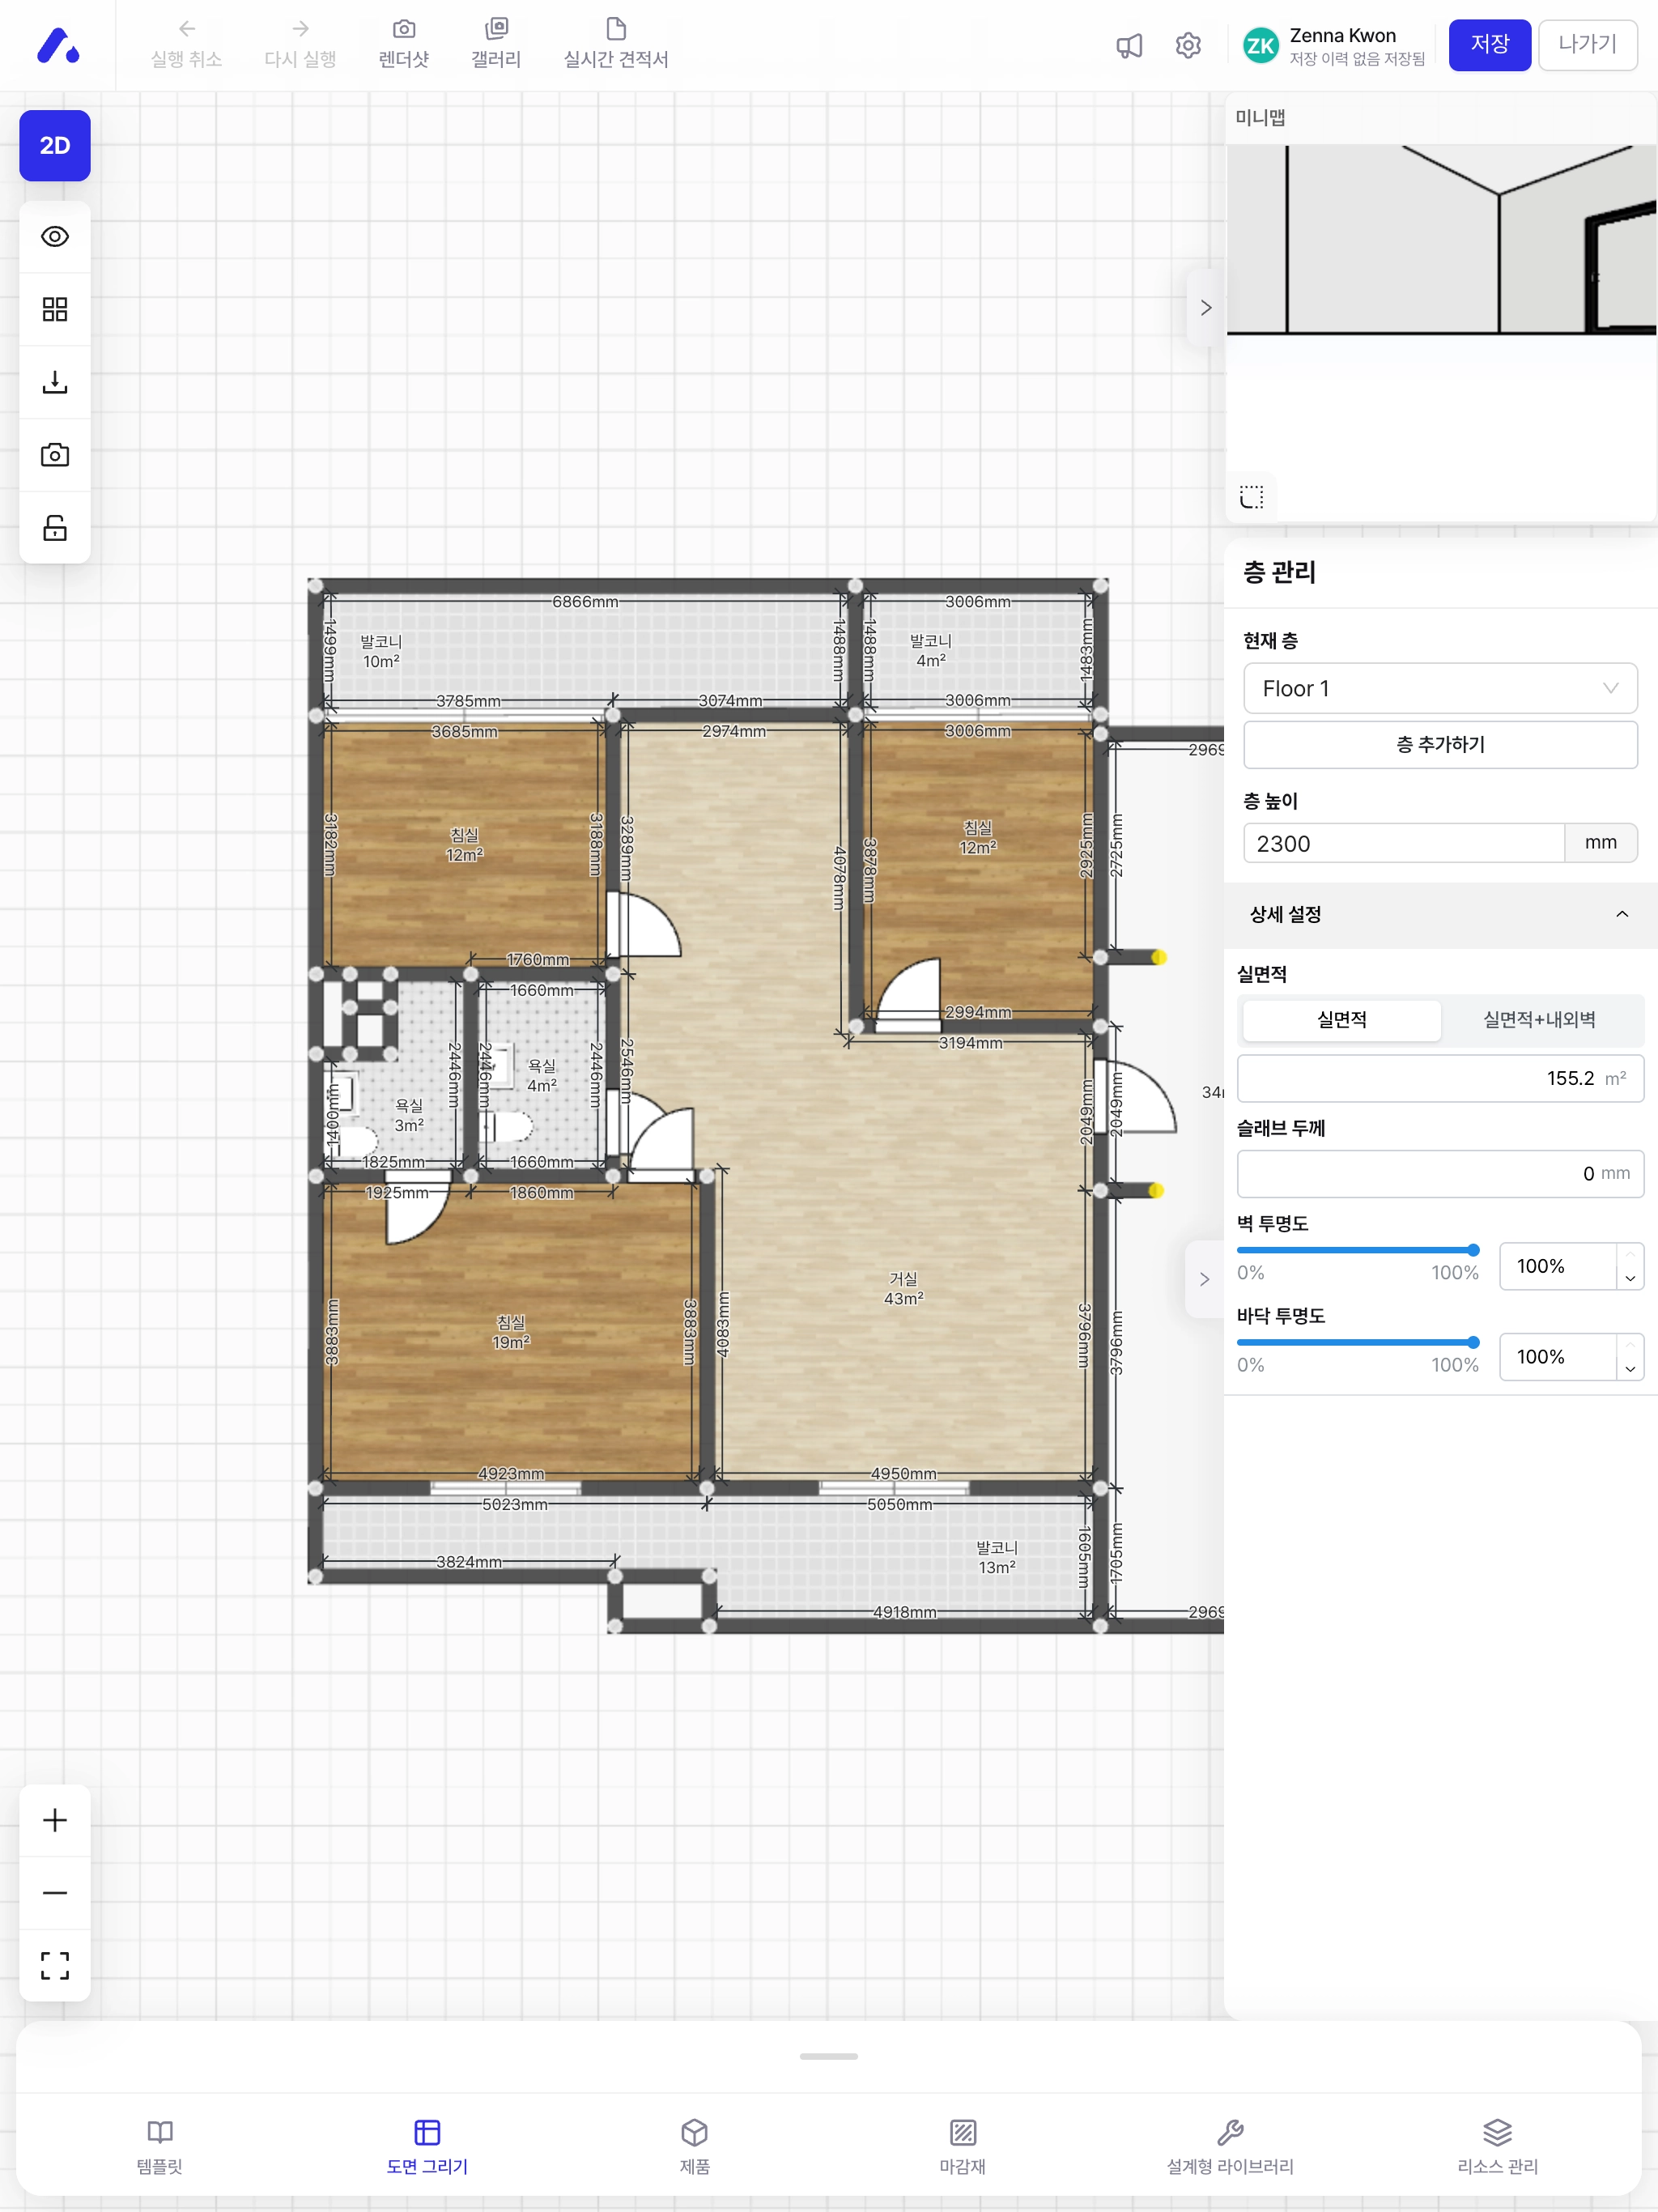
<figure><img src="https://1040484064-files.gitbook.io/~/files/v0/b/gitbook-x-prod.appspot.com/o/spaces%2Fs45pRyTQeyYi0T0toKii%2Fuploads%2Fgit-blob-775cf554c60fcc09ea572e9f49f8c010100cf48d%2Fundefined-6.png?alt=media" alt=""><figcaption></figcaption></figure>

The editor is broadly divided into the top menu / left tools / center canvas / bottom menu.

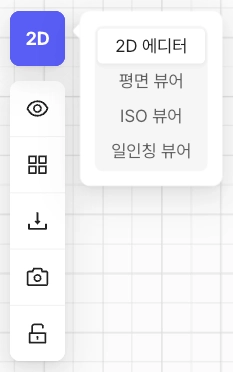
<figure><img src="https://1040484064-files.gitbook.io/~/files/v0/b/gitbook-x-prod.appspot.com/o/spaces%2Fs45pRyTQeyYi0T0toKii%2Fuploads%2Fgit-blob-b6624623df848b9fd2bfd0b04dfefa70a14f1582%2Fundefined-7.png?alt=media" alt=""><figcaption><p>2D editor screen — You can switch between 2D, 3D, and Viewer in the upper left.</p></figcaption></figure>

#### **Switch views (upper left)** — You can switch between 2D ↔ 3D and choose a viewer.

| Viewer              | Use it in these cases                                    |
| ------------------- | -------------------------------------------------------- |
| 2D editor           | When drawing and editing floor plans                     |
| Plan viewer         | When checking layouts in a top-down floor plan view      |
| ISO viewer          | When viewing the entire space in a tilted 3D perspective |
| First-person viewer | When looking around the space from eye level             |

#### **Top menu** — Render shot (rendering) / Gallery (collection of results) / Real-time quote / Save / Exit.

<figure><img src="https://1040484064-files.gitbook.io/~/files/v0/b/gitbook-x-prod.appspot.com/o/spaces%2Fs45pRyTQeyYi0T0toKii%2Fuploads%2Fgit-blob-652be9b5732115092958ee6278b84a78b9f0be3f%2Fundefined-8.png?alt=media" alt=""><figcaption></figcaption></figure>

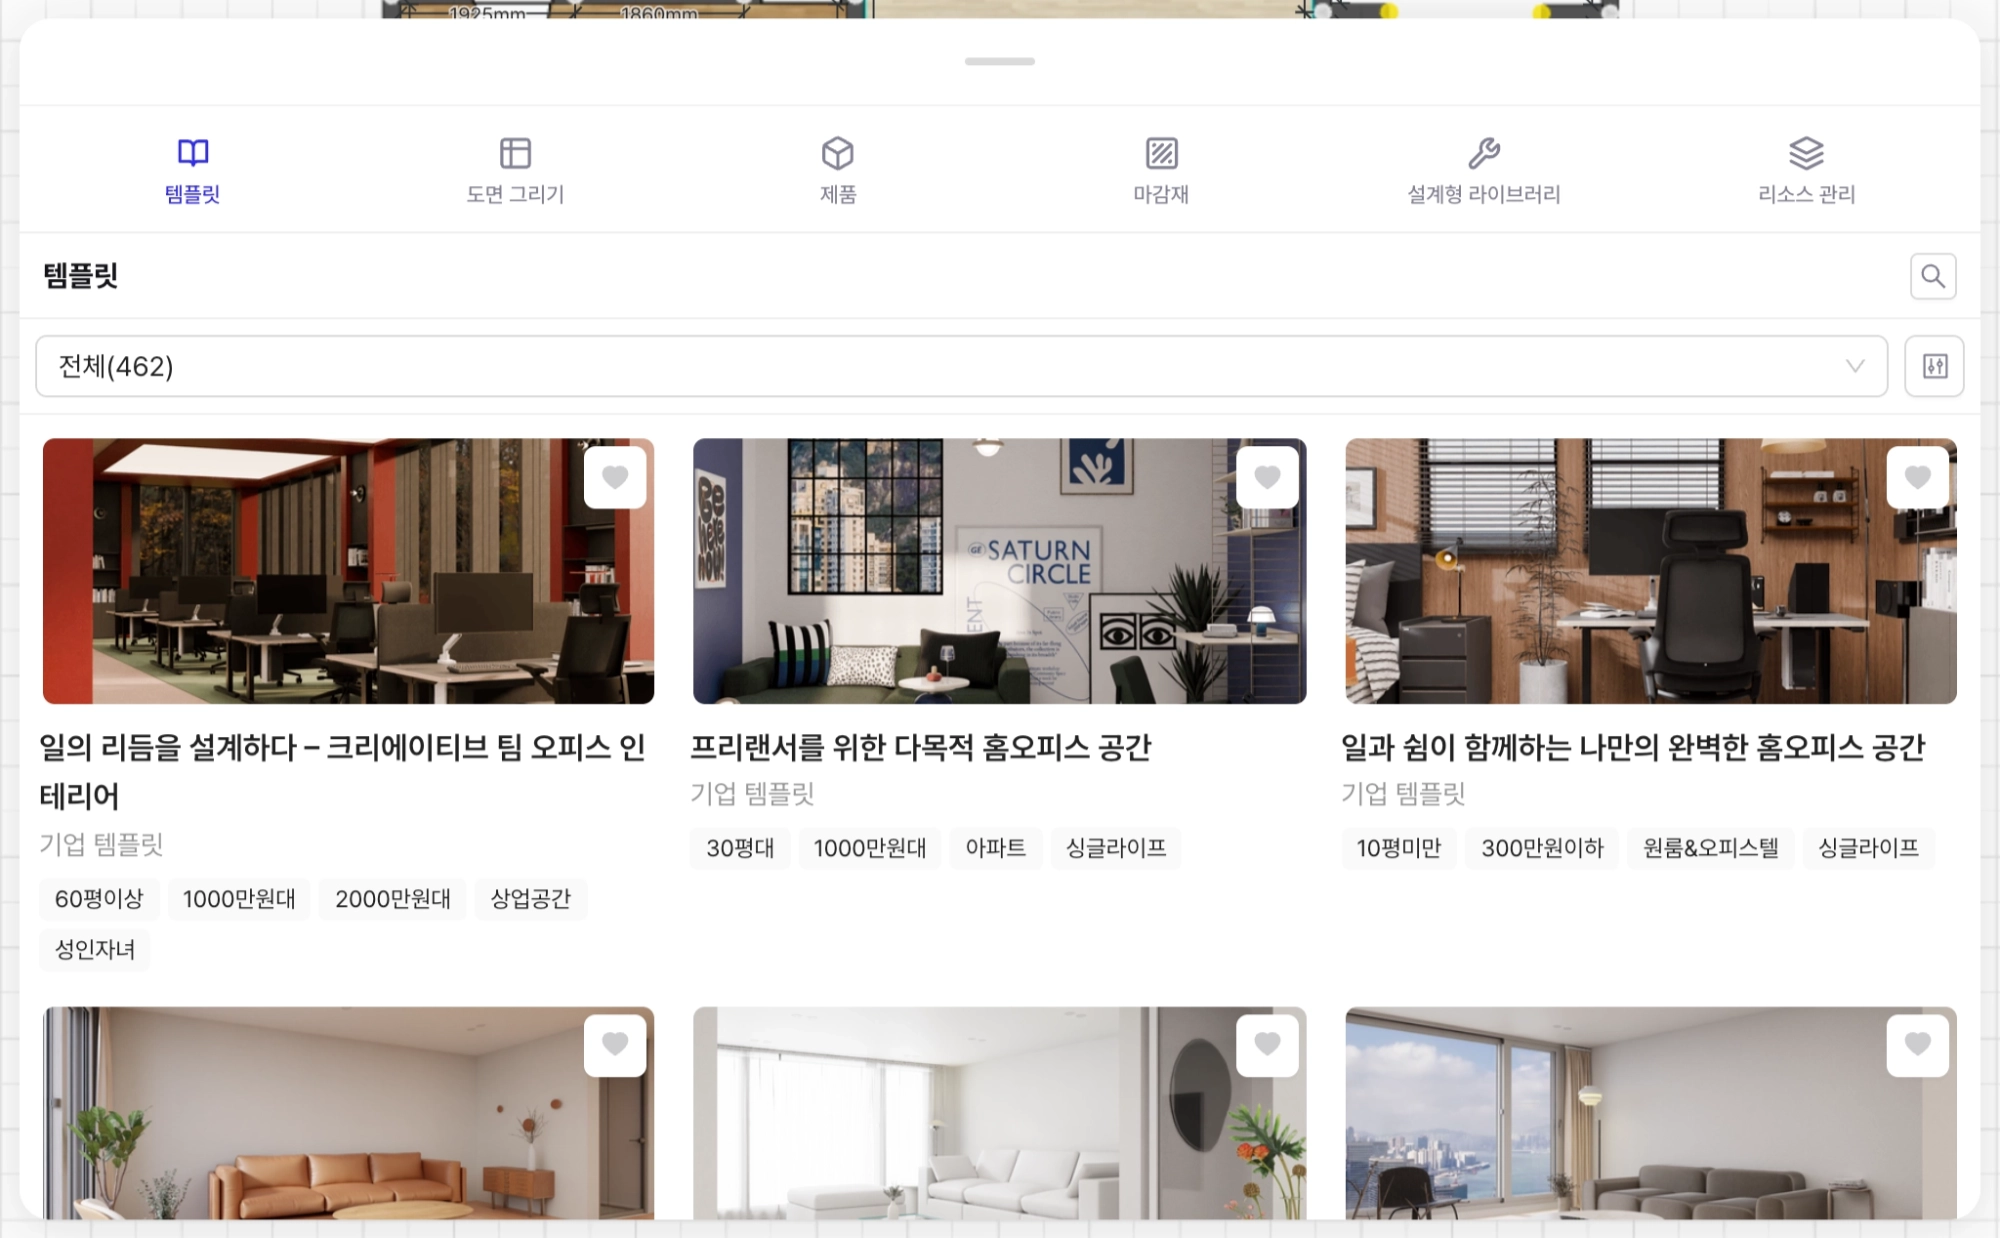
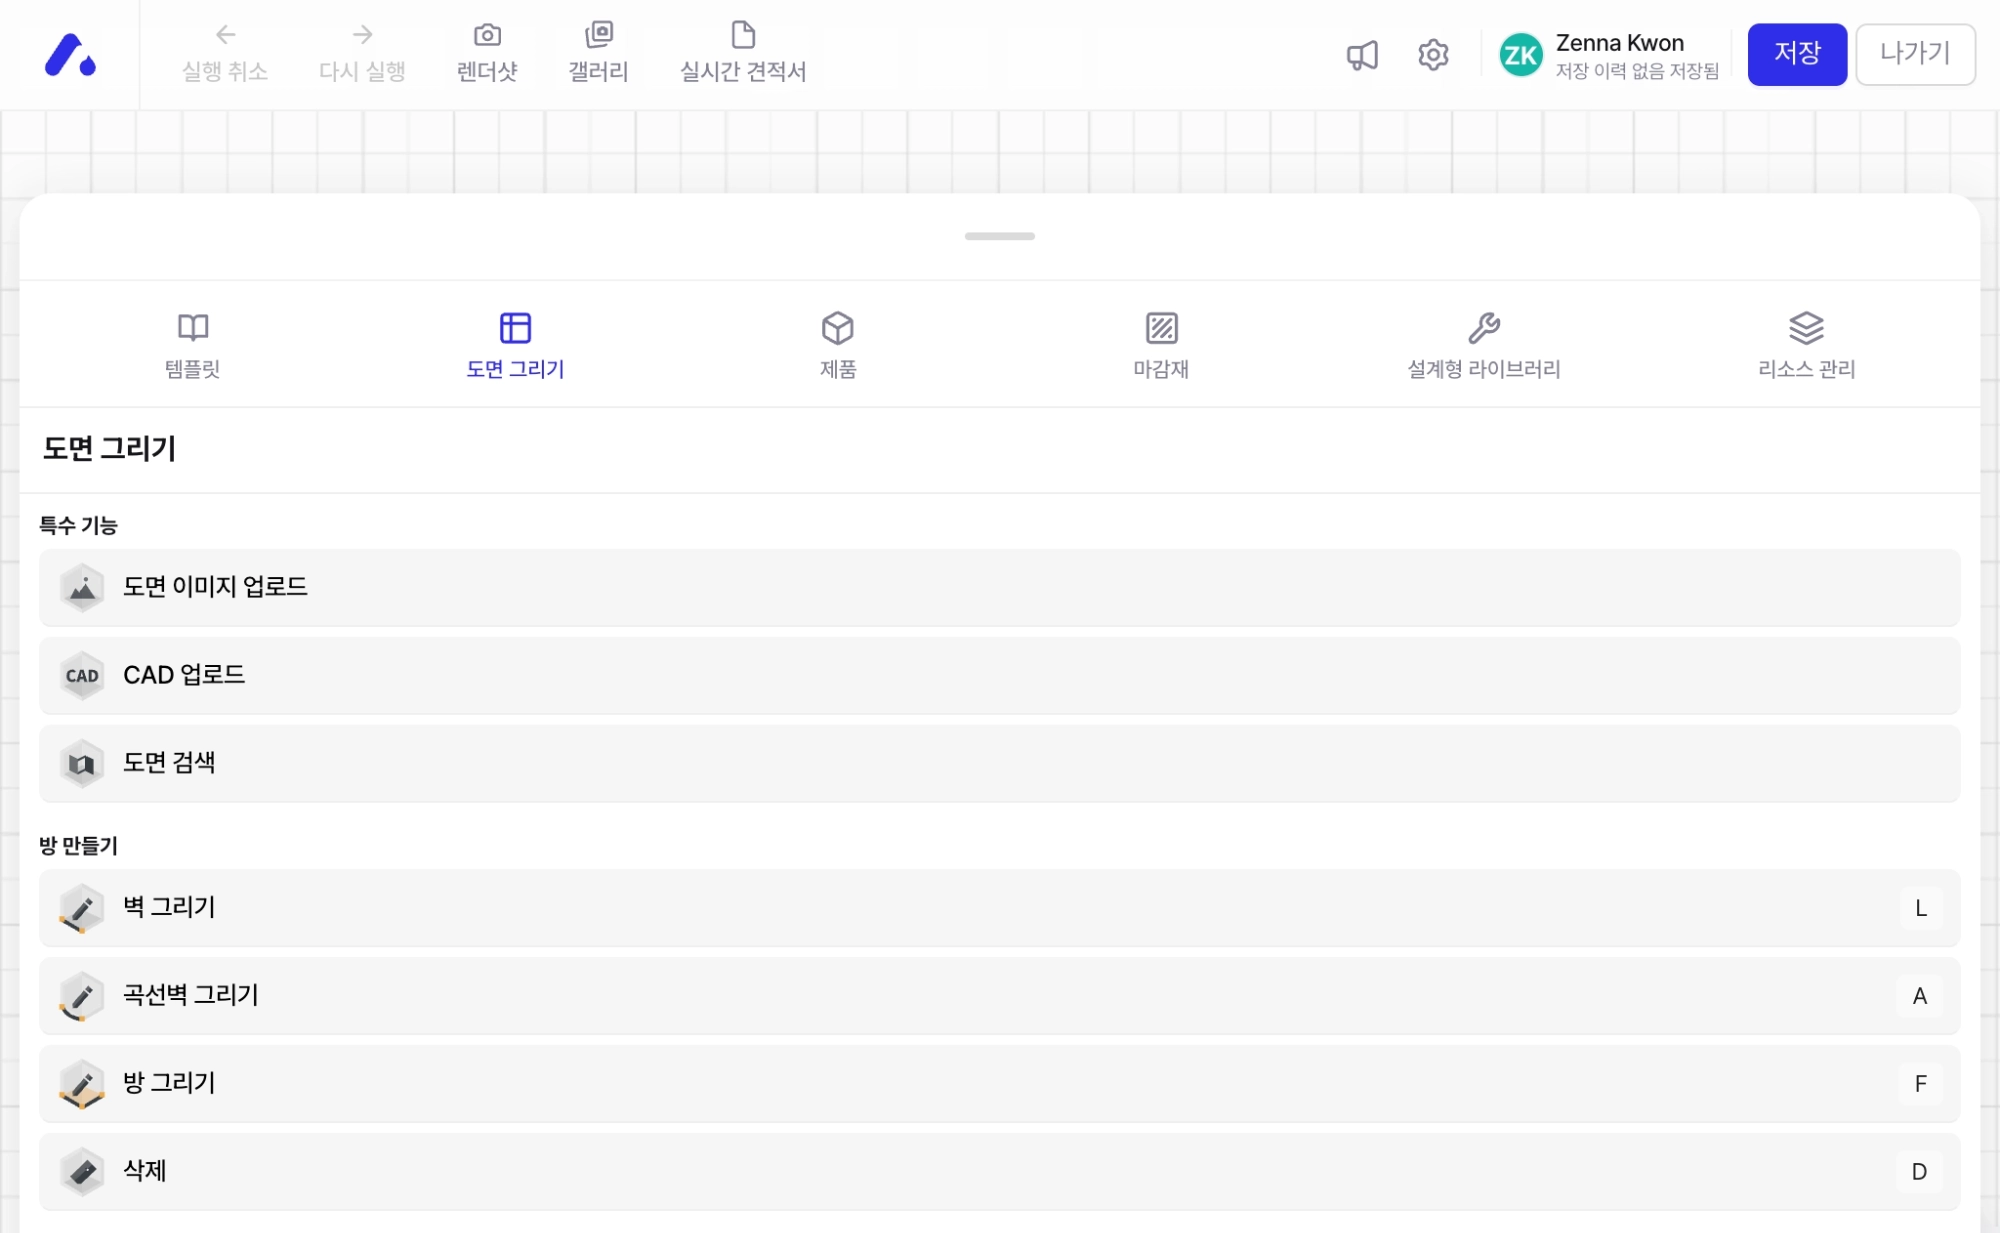
#### **Bottom menu** — This is the core of the work.

<figure><img src="https://1040484064-files.gitbook.io/~/files/v0/b/gitbook-x-prod.appspot.com/o/spaces%2Fs45pRyTQeyYi0T0toKii%2Fuploads%2Fgit-blob-04ed8ed4e67bdd170d6bd1fbedec065c36a00efc%2Fundefined-9.png?alt=media" alt=""><figcaption></figcaption></figure>

| **Bottom menu**     | What it does                                                  |
| ------------------- | ------------------------------------------------------------- |
| Template            | Start with a pre-made space template                          |
| Draw floor plan     | Draw walls, rooms, pillars, etc. directly                     |
| Products            | Search for and place furniture and products                   |
| Finishes            | Change the color and material of walls, floors, and furniture |
| Design library      | Dimension-customizable products such as parametric furniture  |
| Resource management | Organize used products and materials                          |

### 5. Touch control basics

<figure><img src="https://1040484064-files.gitbook.io/~/files/v0/b/gitbook-x-prod.appspot.com/o/spaces%2Fs45pRyTQeyYi0T0toKii%2Fuploads%2Fgit-blob-60016ad3e5653c0275455e9ec3c63bdce5d15318%2Fundefined-10.png?alt=media" alt=""><figcaption></figcaption></figure>

These are the basic actions you perform with your fingers, without a mouse.

* **Draw walls, rooms, pillars, and guide lines** — With your finger **Touch drag**to draw. So the screen doesn't move while you're drawing **Lock**.
* **Align precisely** — The snapping range is widened, so even with your finger you can fit walls and furniture exactly.
* **Place and rotate furniture** — When you touch a piece of furniture, in 2D it is automatically placed in the center of the canvas, and in 3D in the center of the camera view. **Rotation is also done by touch drag.**&#x69;s done by touch drag.
* **Length input** — On multi-touch devices such as digital whiteboards, the length input field may be disabled.

### 6. Placing furniture

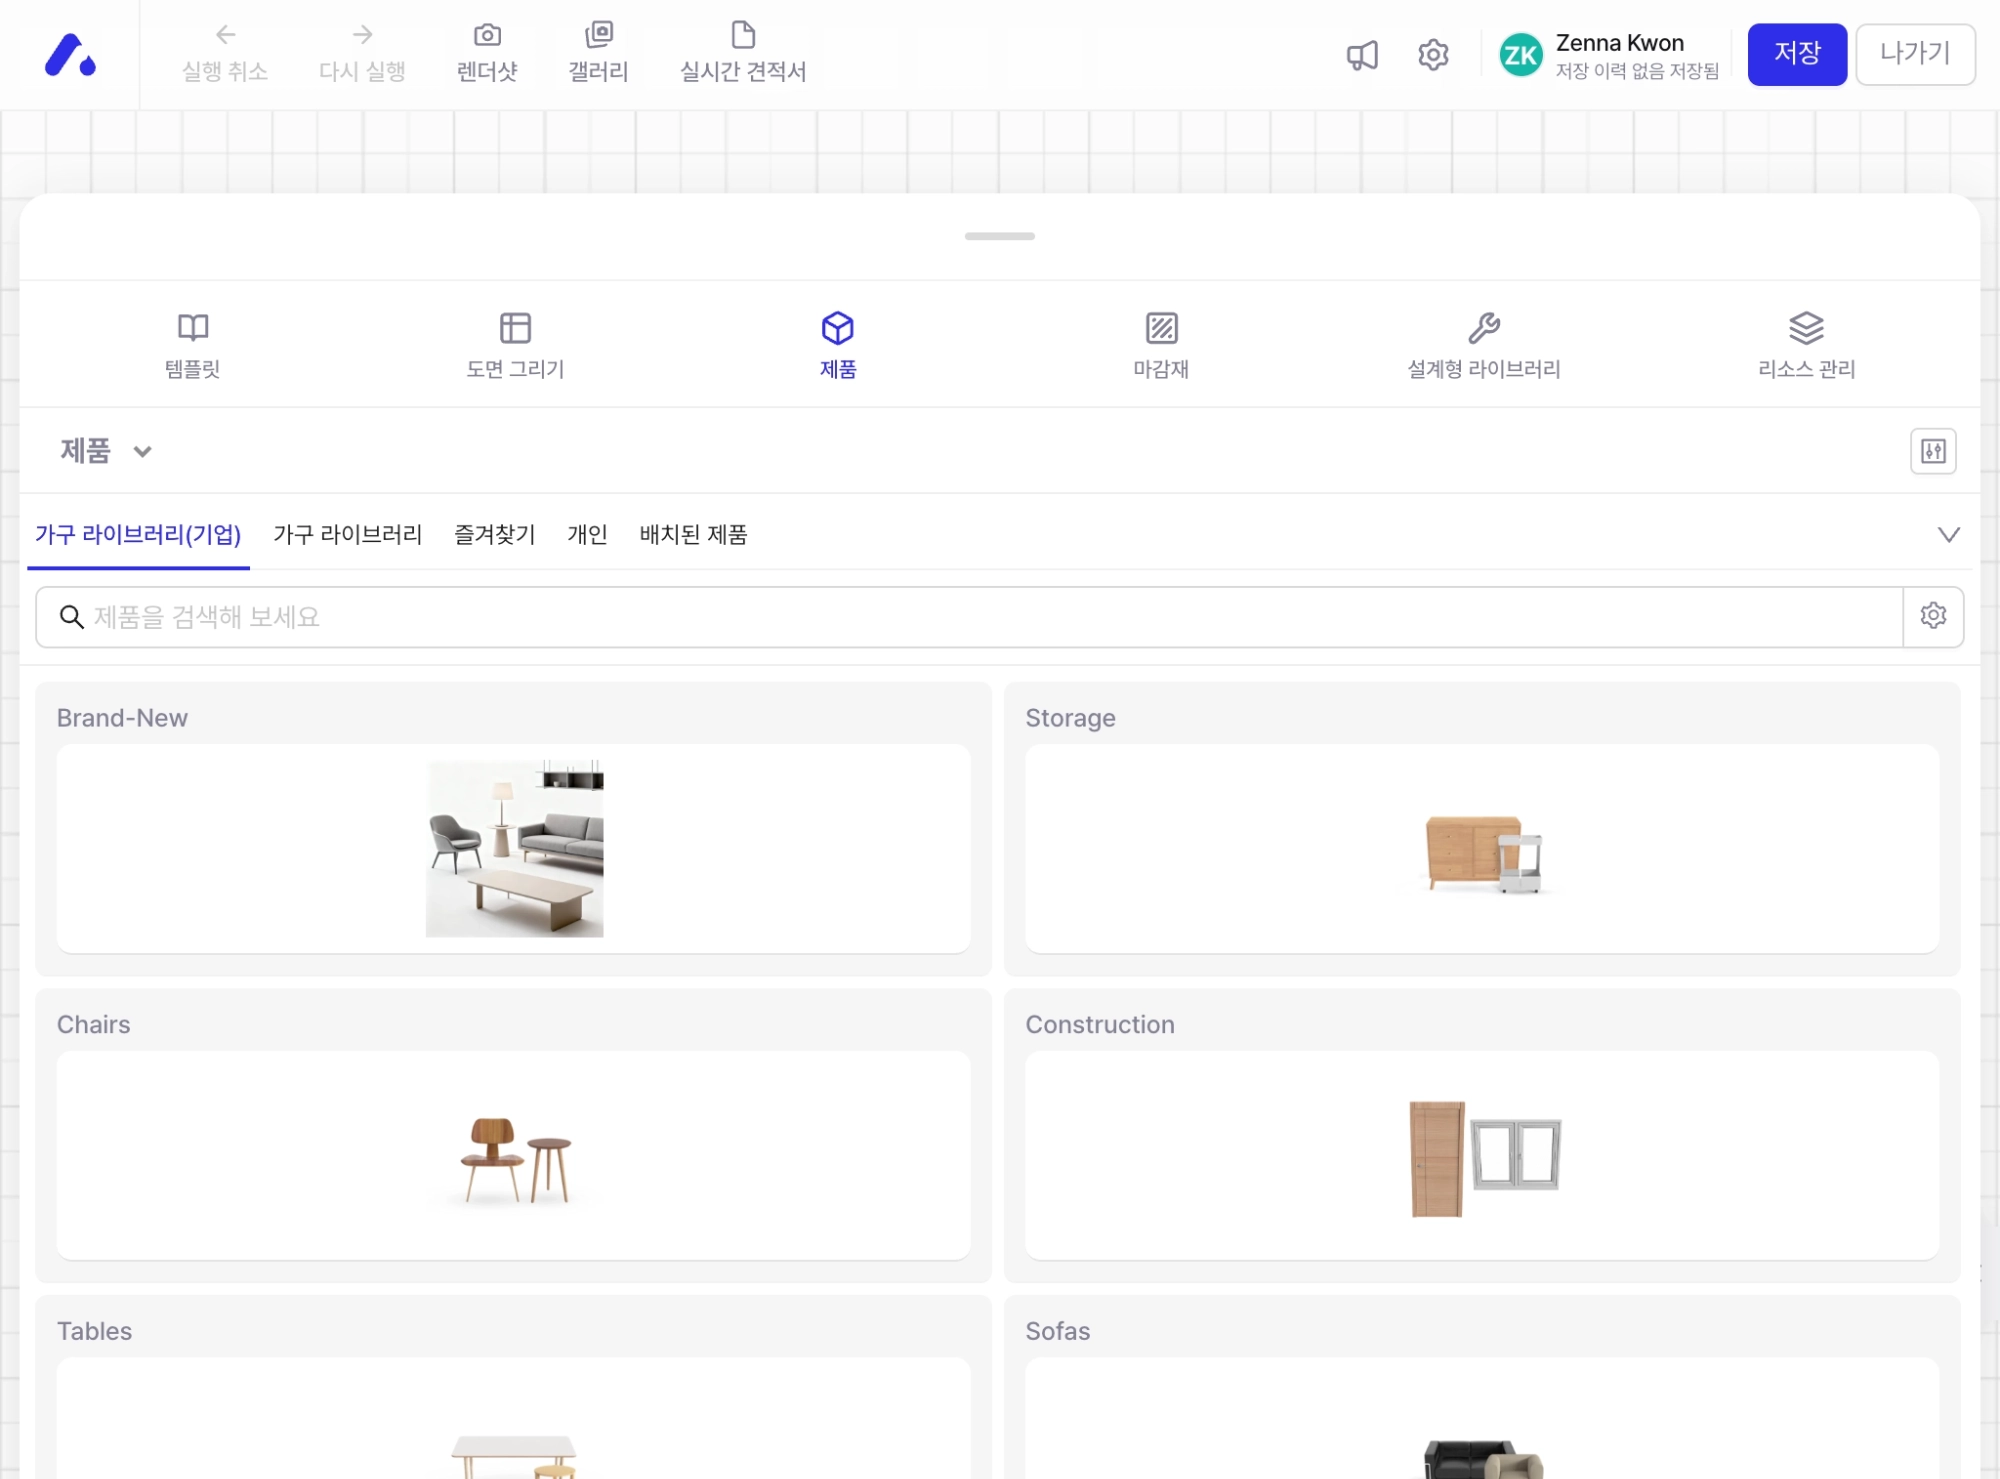
1. At the bottom **Products** Open the tab.
2. By product name **Search**or find it by category.
3. Touch the product you want and it will be placed in the center of the screen. **Adjust position and rotation with touch drag**set.
4. You can review and edit placed products in the left and right panels.

<figure><img src="https://1040484064-files.gitbook.io/~/files/v0/b/gitbook-x-prod.appspot.com/o/spaces%2Fs45pRyTQeyYi0T0toKii%2Fuploads%2Fgit-blob-a2071dbbbc7692adcd263bea830482df63648f63%2Fundefined-11.png?alt=media" alt=""><figcaption><p>▲ In the [Products] tab: search → place by touch → drag to adjust position and rotation</p></figcaption></figure>

{% hint style="info" %}
For furniture whose dimensions need to be changed **Design library (parametric)** products, you can adjust width, height, depth, and more on the spot.
{% endhint %}

### 7. Changing finishes and colors

This is the step where you compare by changing colors and materials.

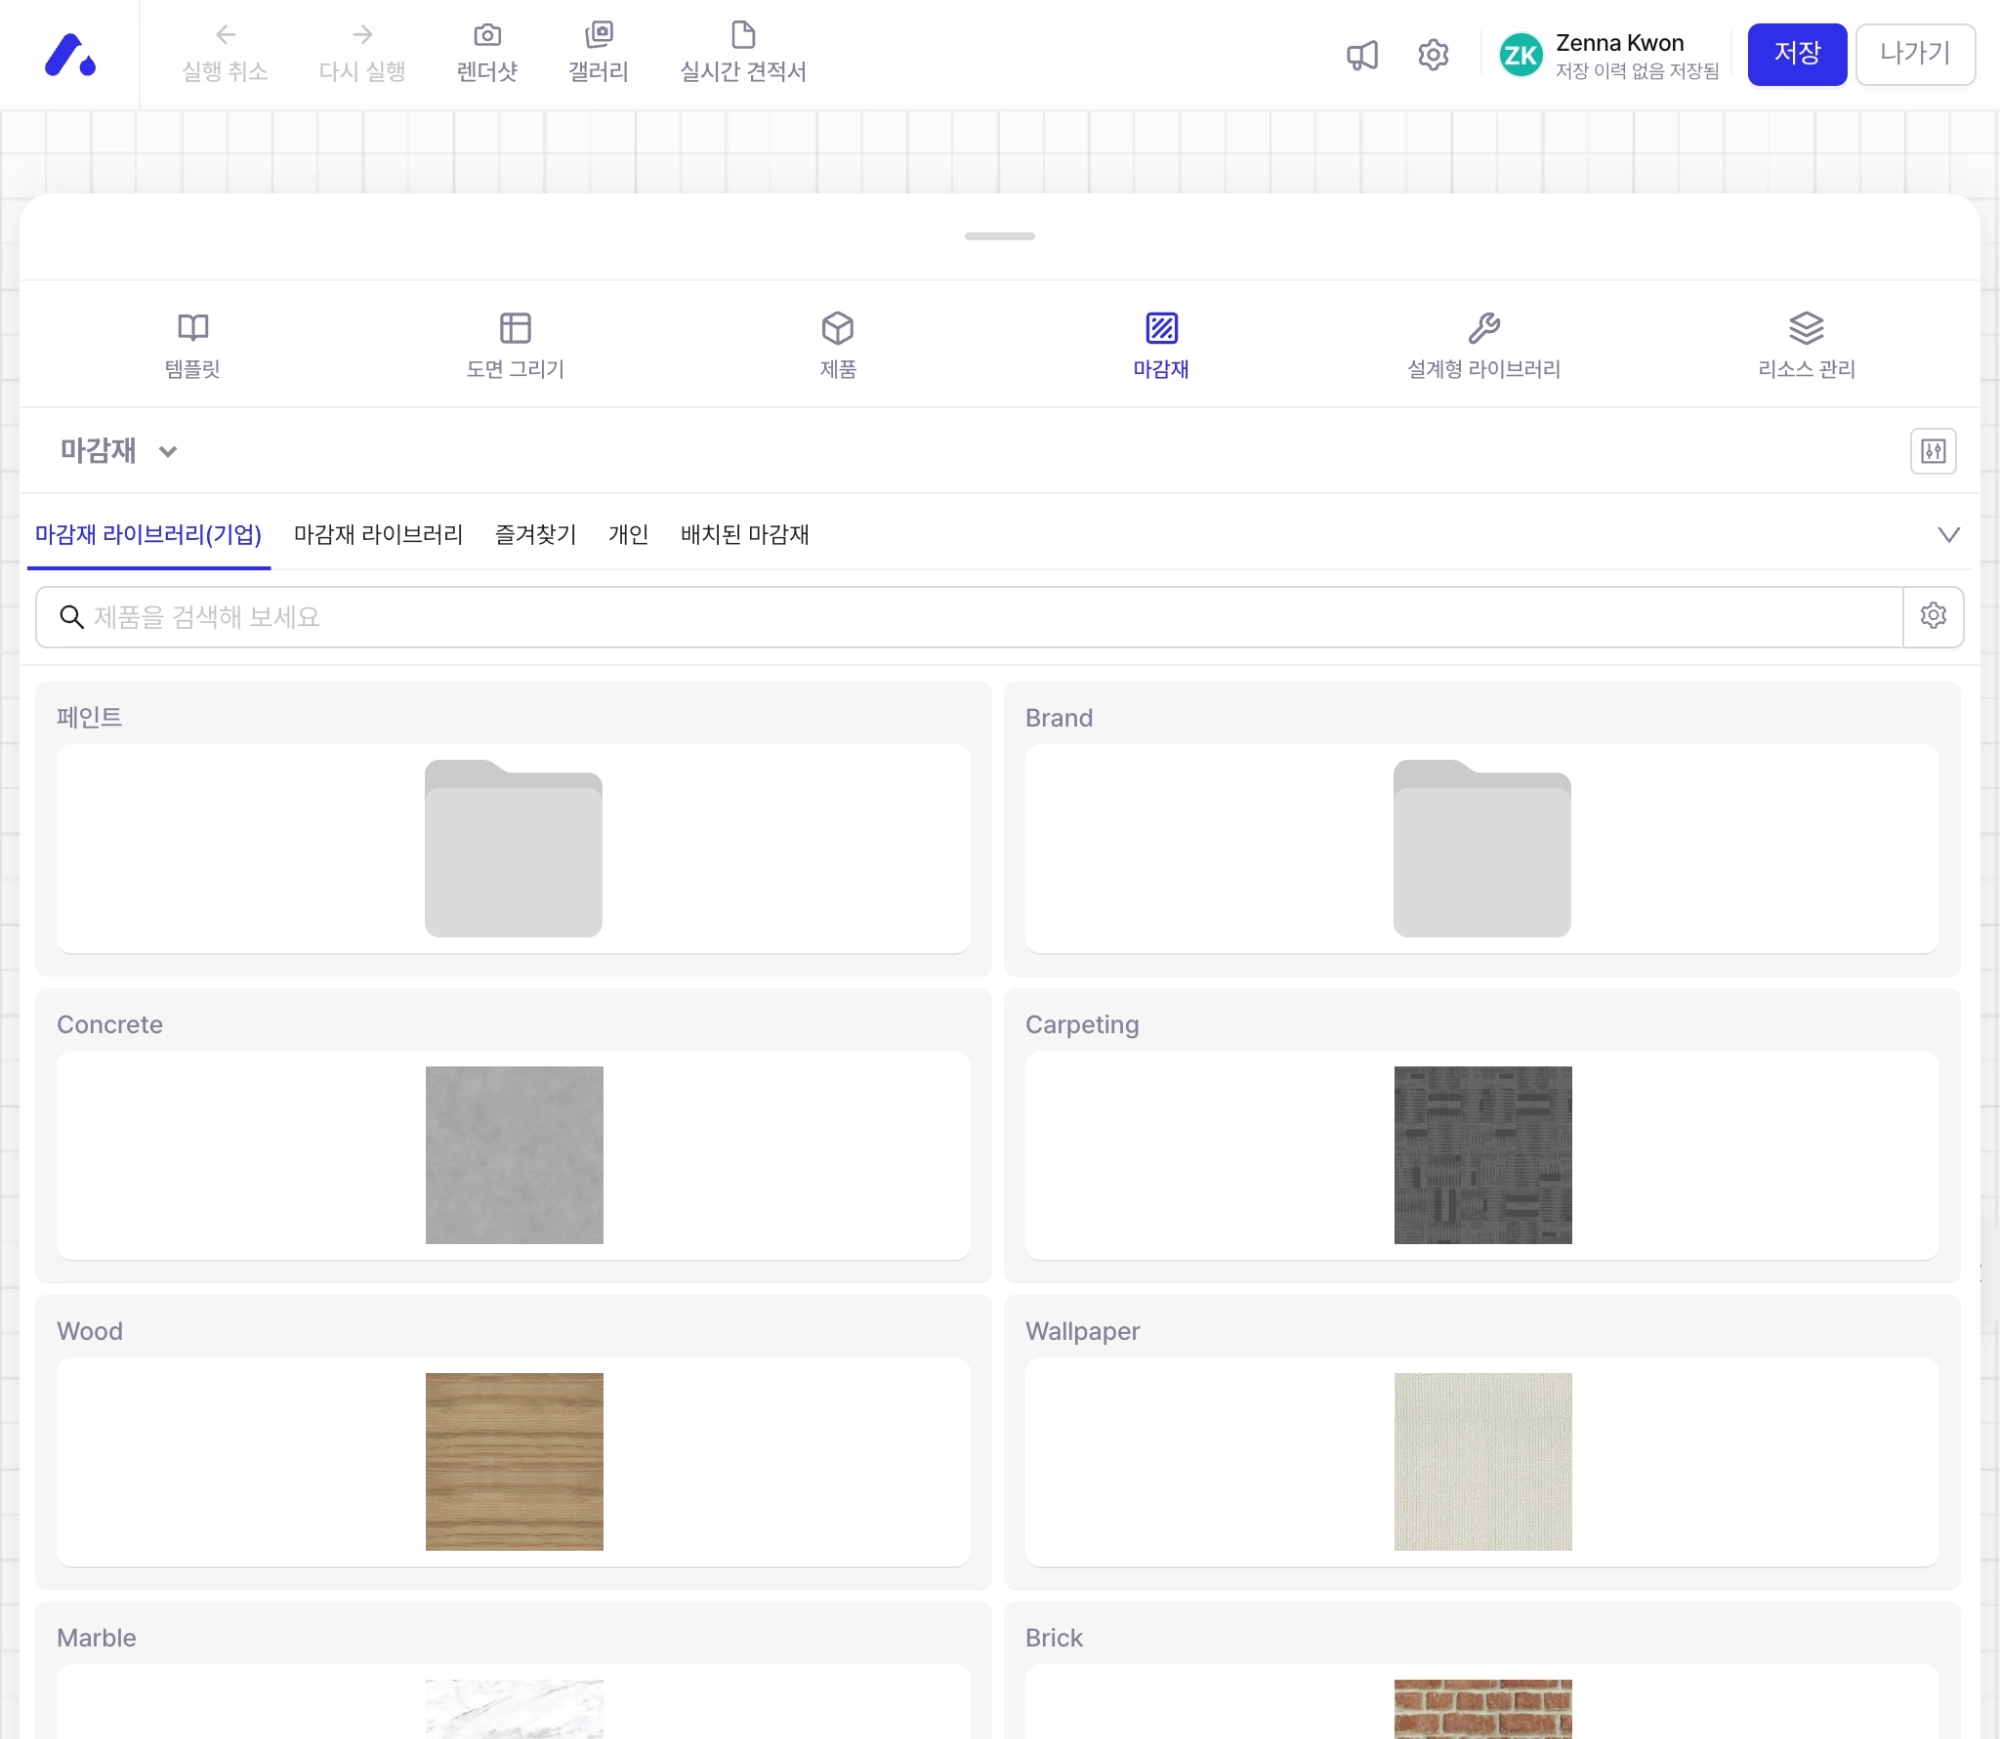
1. At the bottom **Finishes** Open the tab.
2. Select the area you want to change (walls, floors, furniture, etc.).
3. Choose the desired color or material and it will be applied immediately. You can change multiple options and compare them.

<figure><img src="https://1040484064-files.gitbook.io/~/files/v0/b/gitbook-x-prod.appspot.com/o/spaces%2Fs45pRyTQeyYi0T0toKii%2Fuploads%2Fgit-blob-de65232c64b845a856e59c942ded77d4d2139ec6%2Fundefined-12.png?alt=media" alt=""><figcaption><p>▲ In the [Finishes] tab, select a color/material → applied immediately to the selected area</p></figcaption></figure>

### 8. Finish with a render shot

Once the layout is done, turn it into a realistic image and show it.

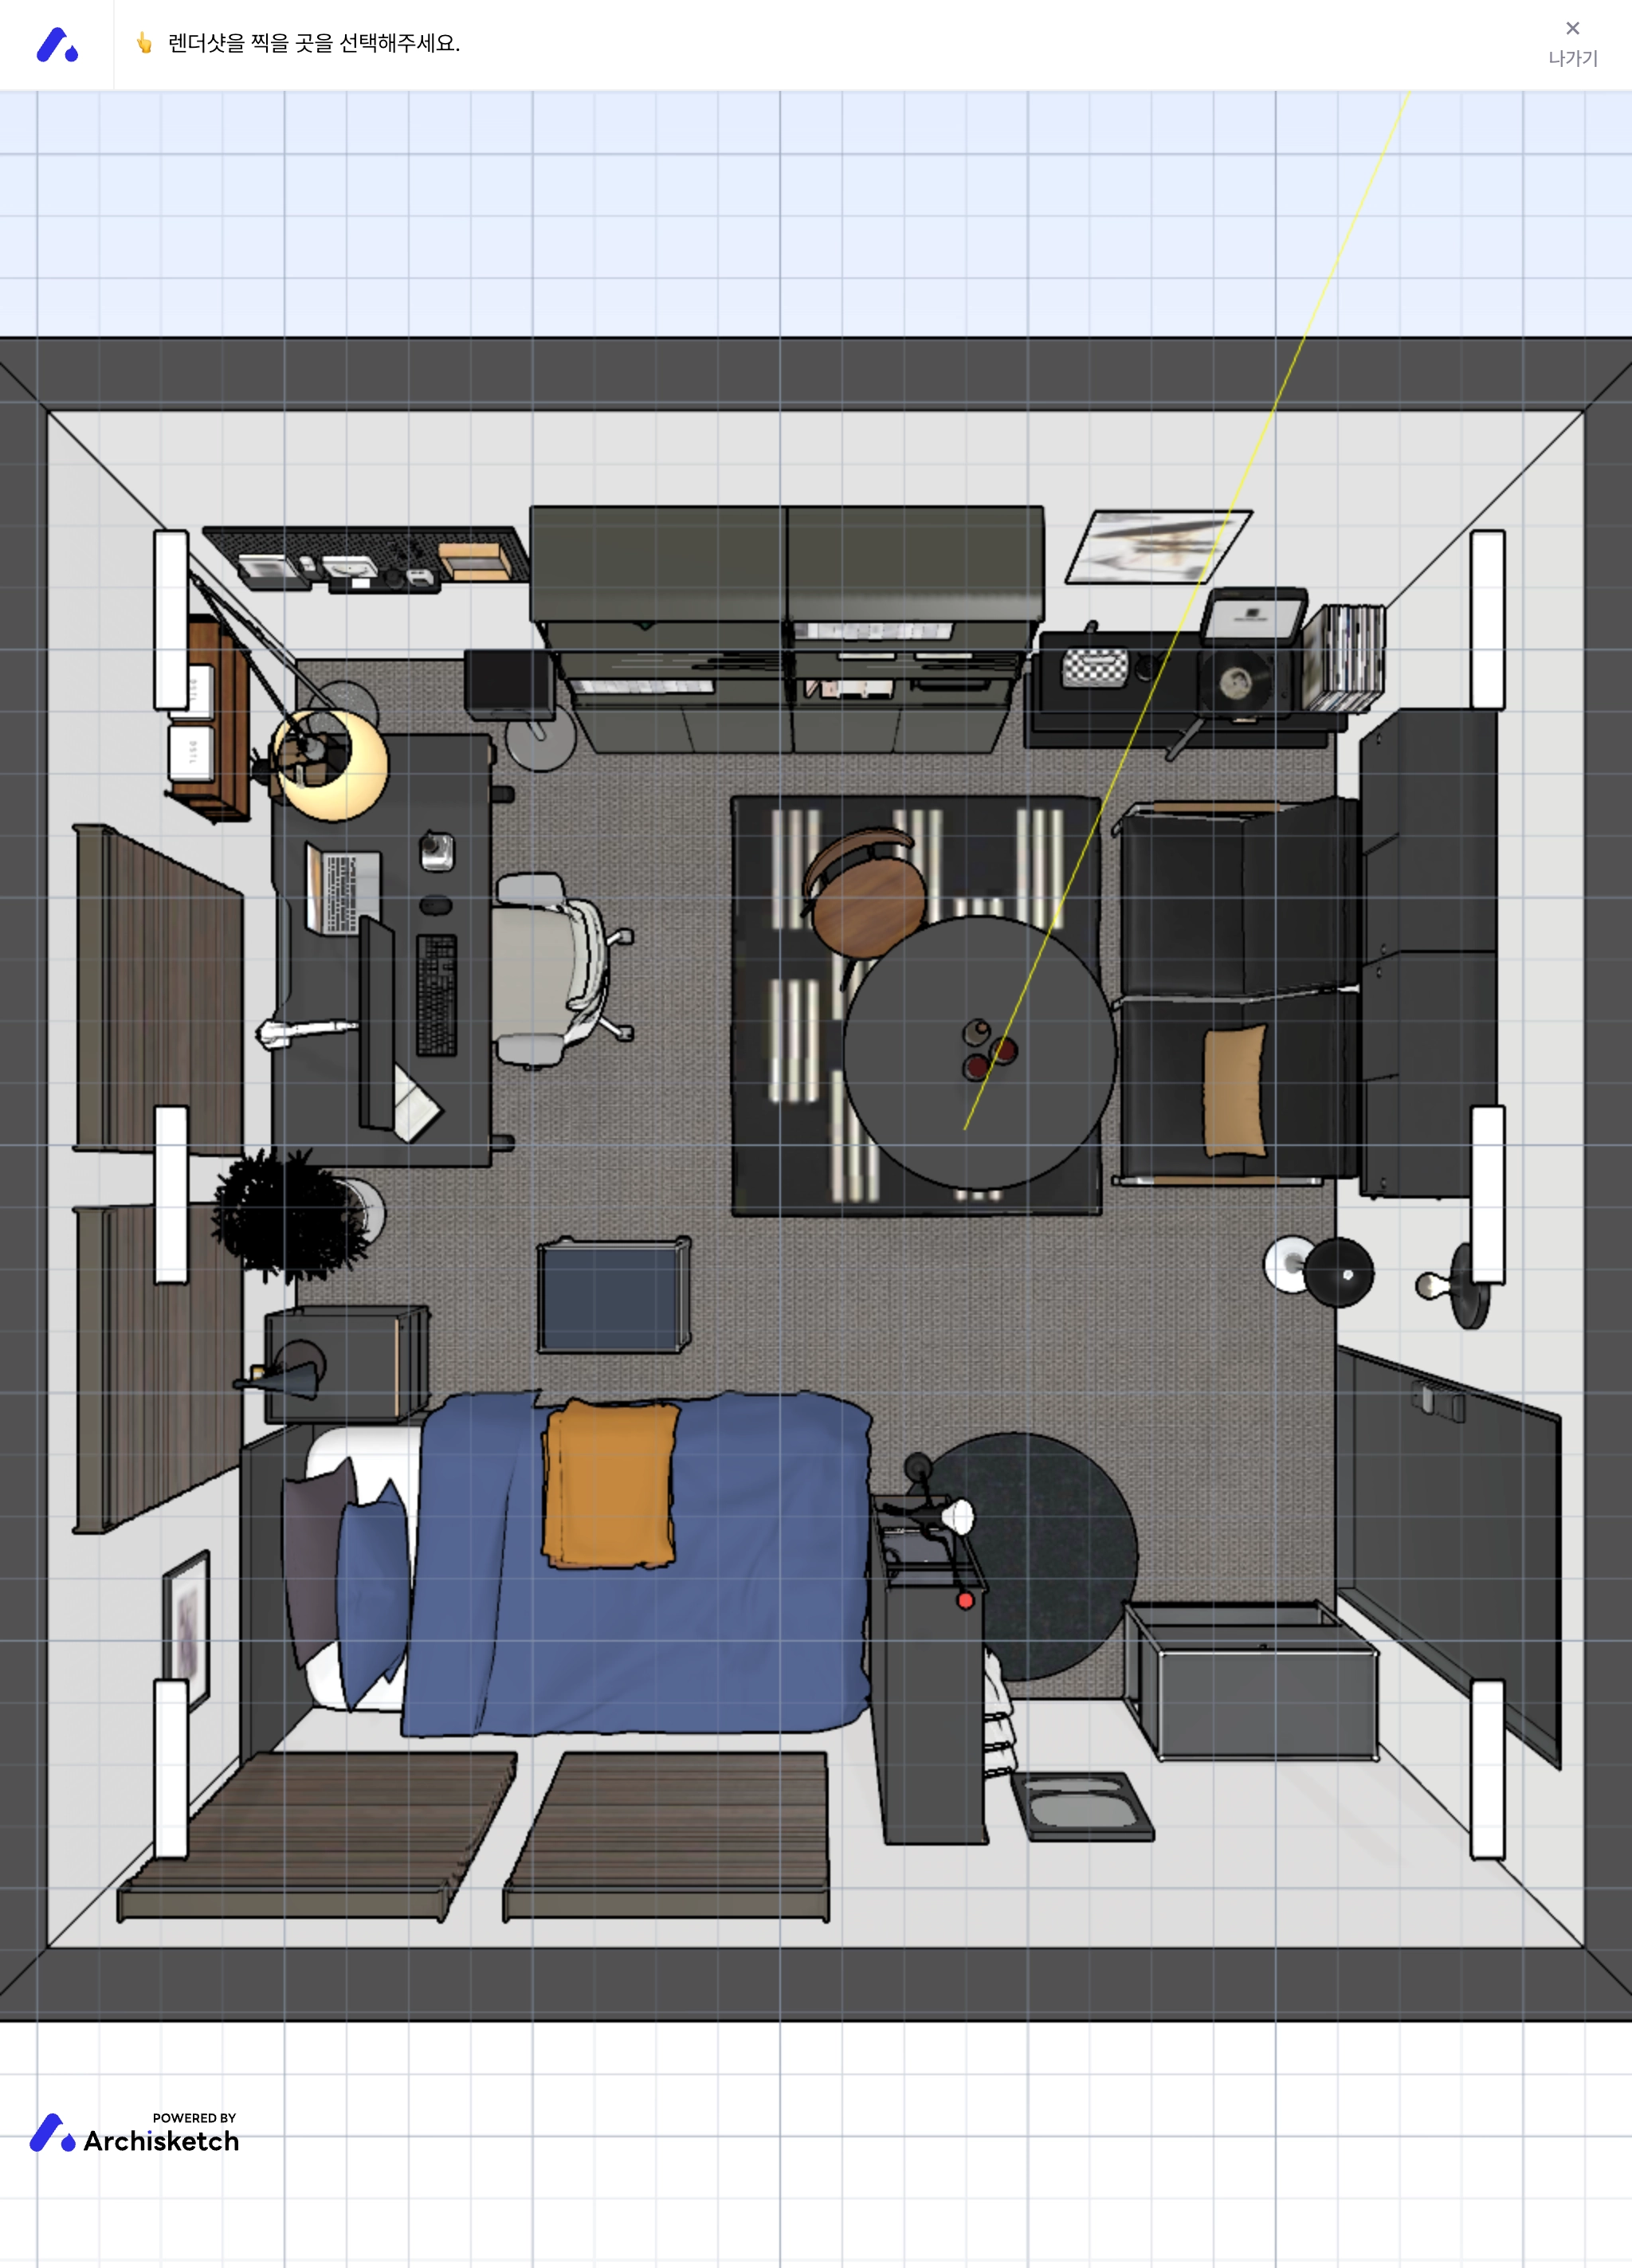
1. Top **Render shot**Press it.
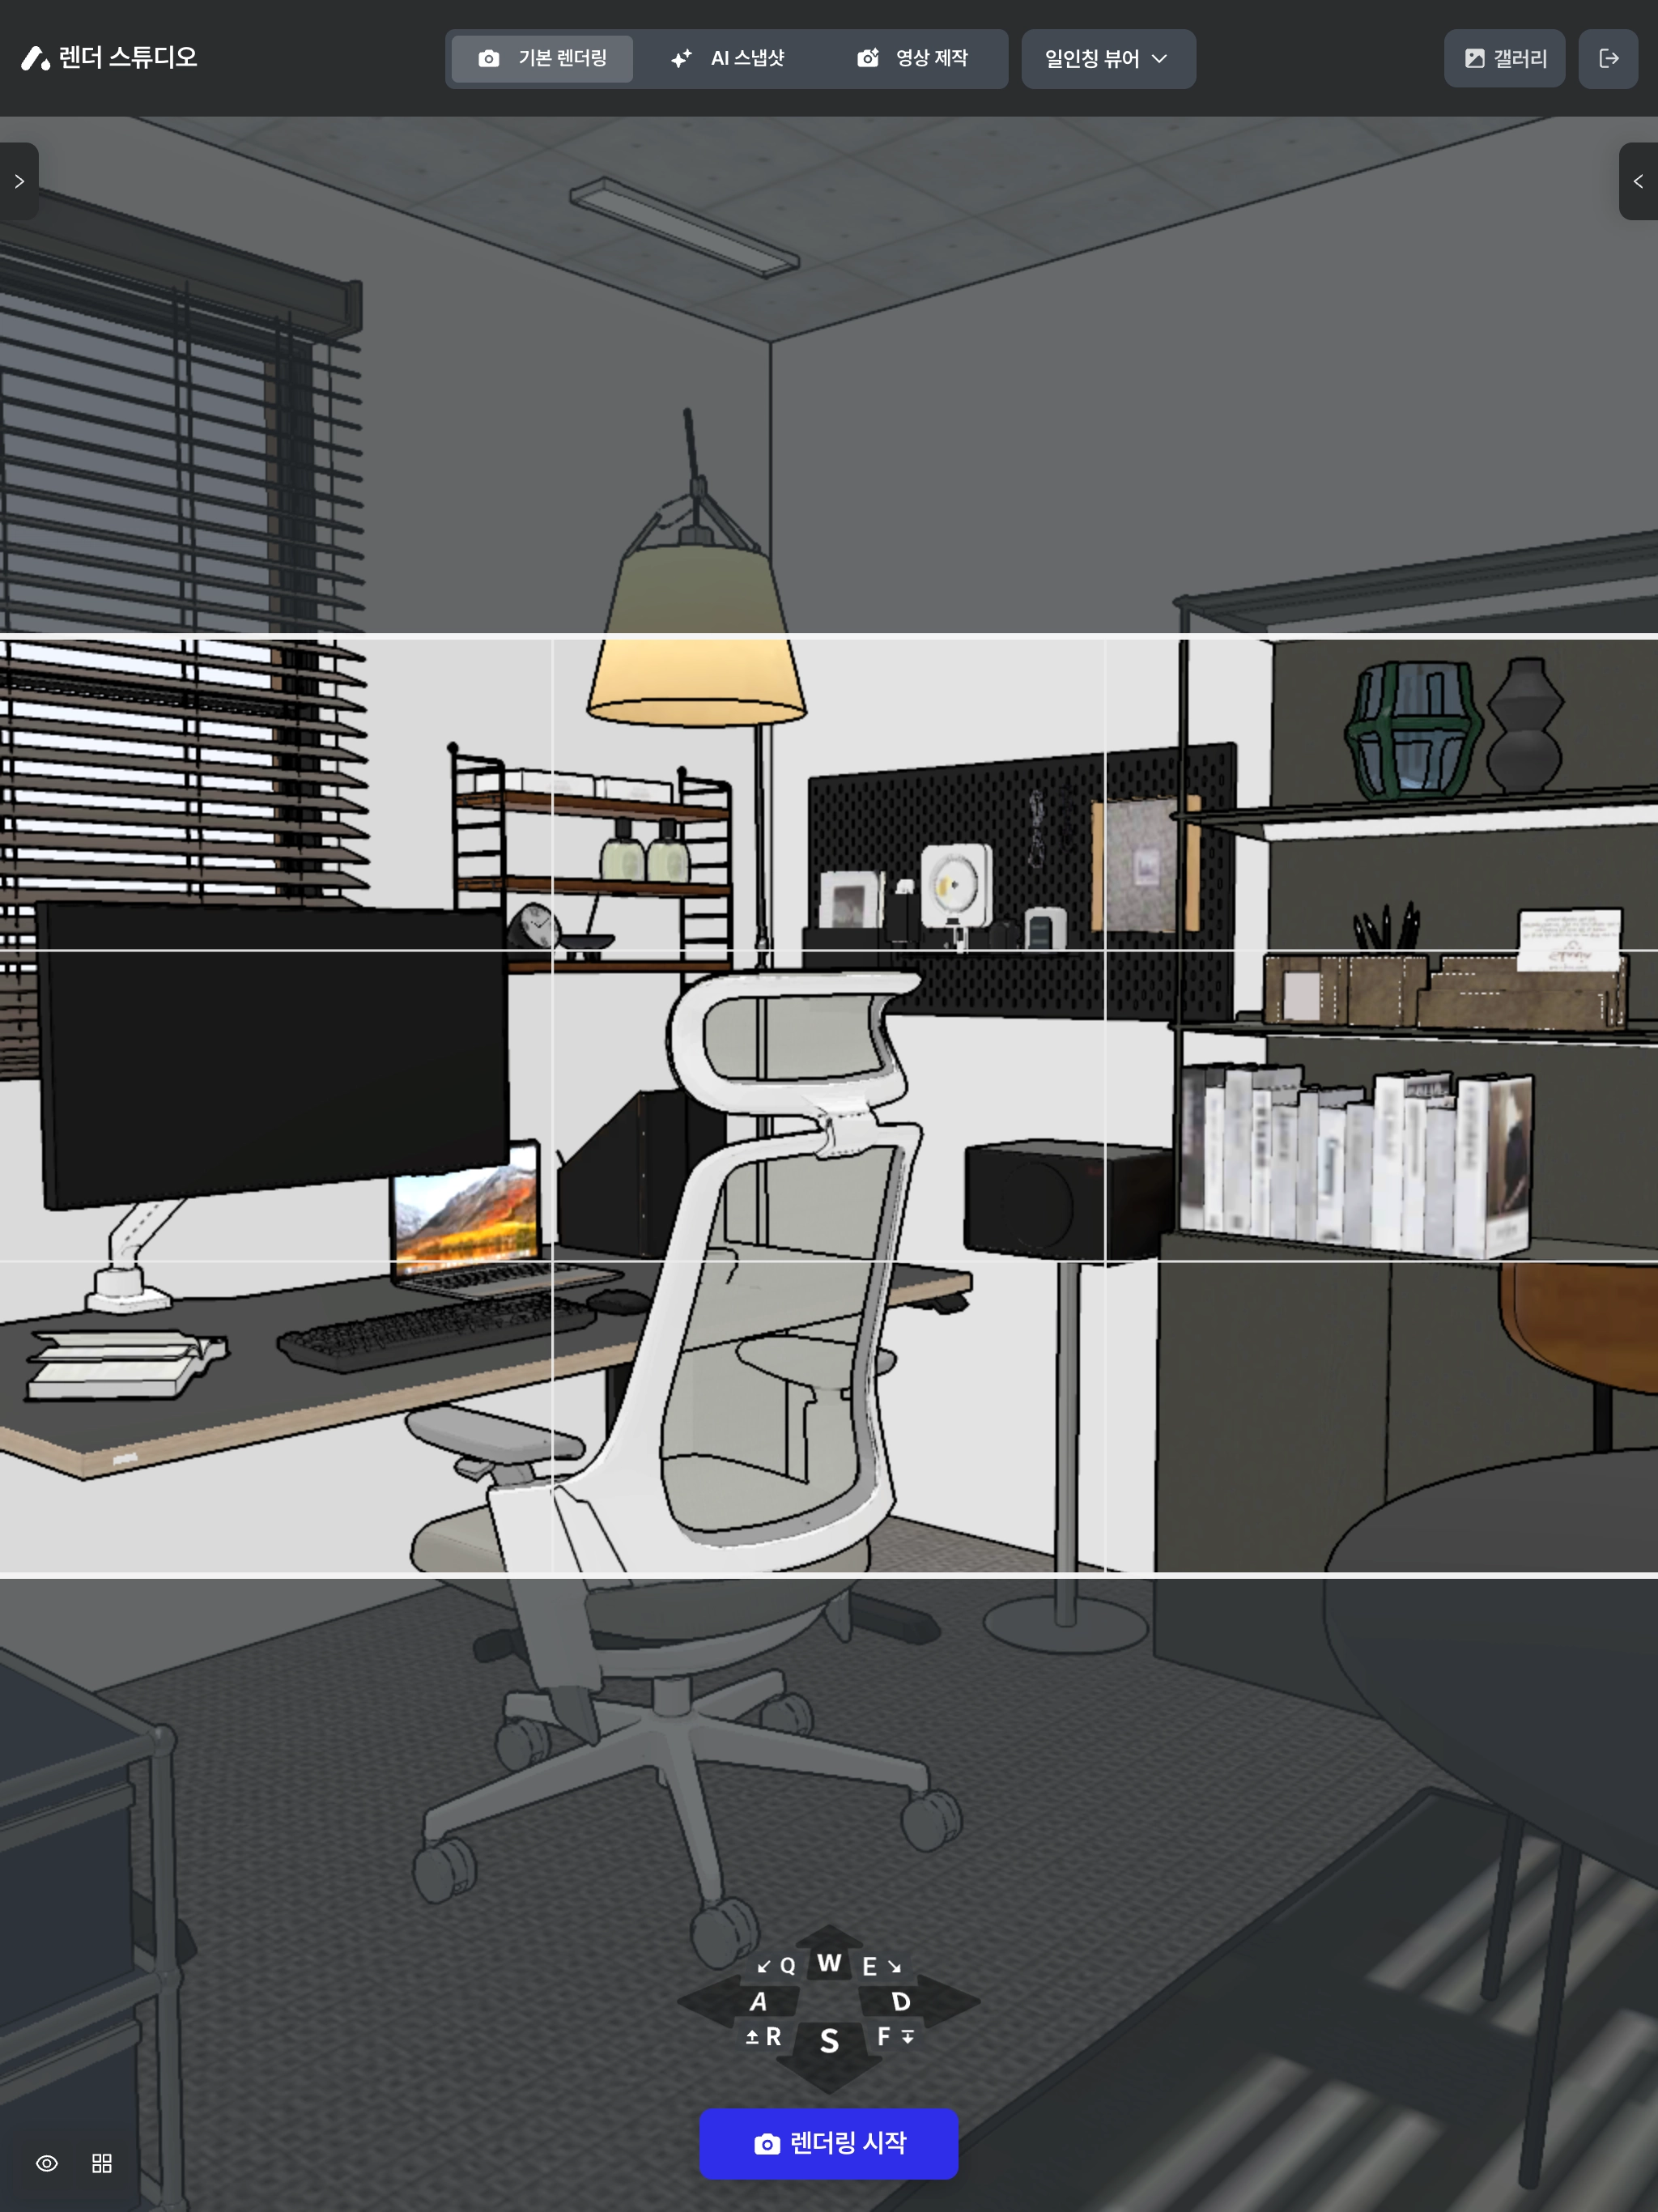
2. Set the camera angle and framing, then run the rendering.
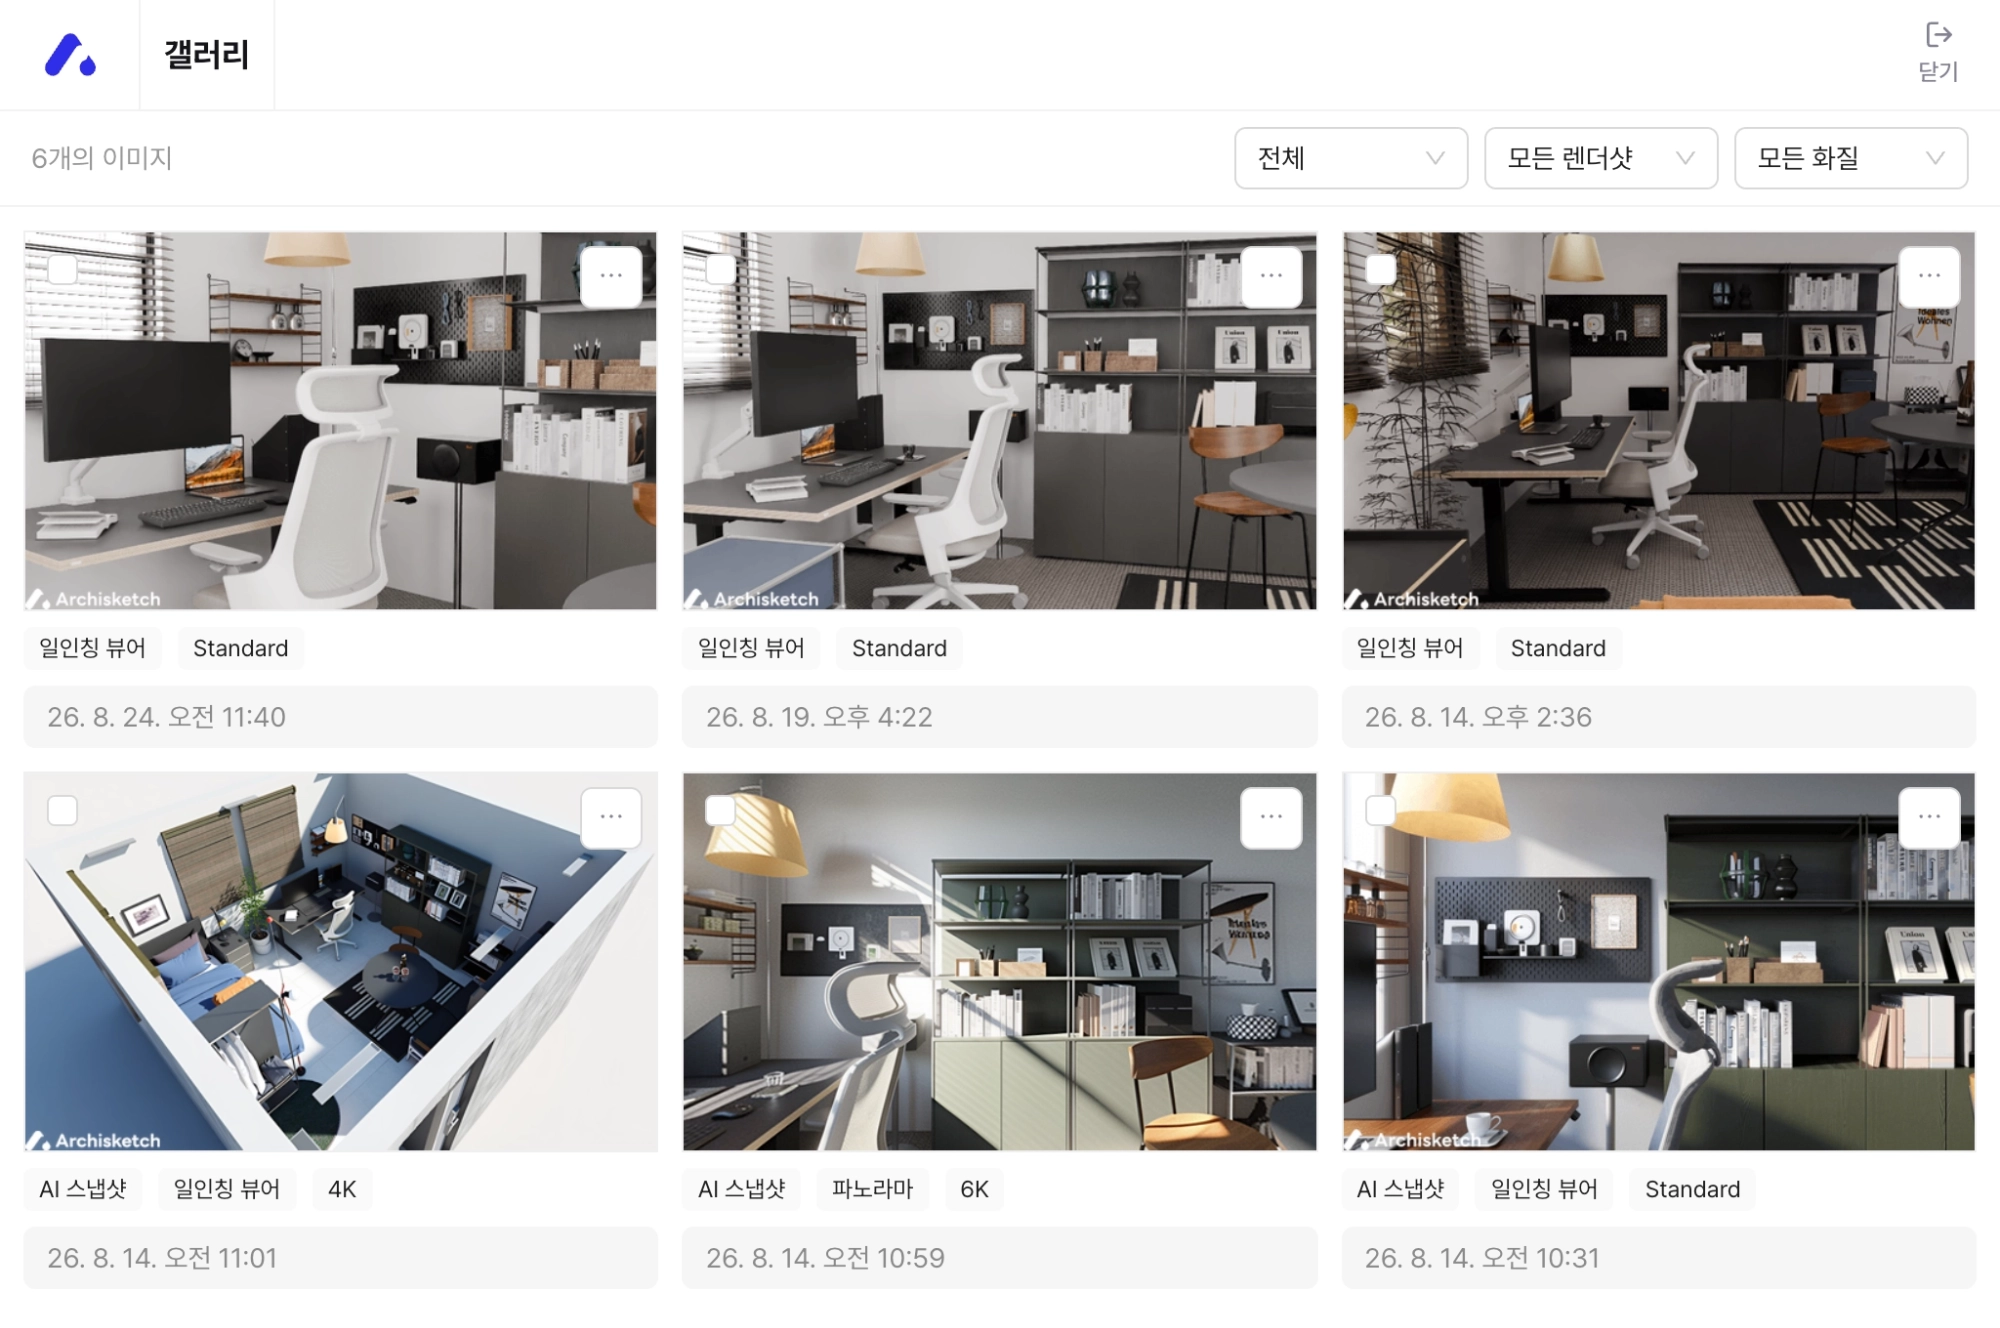
3. After a moment, a realistic image is completed. **Save screen**to save it, and **Gallery**you can collect and view the results there.

<figure><img src="https://1040484064-files.gitbook.io/~/files/v0/b/gitbook-x-prod.appspot.com/o/spaces%2Fs45pRyTQeyYi0T0toKii%2Fuploads%2Fgit-blob-3aac9e4283d7eea9827907e74735ae6f90e6efec%2Fundefined-13.png?alt=media" alt=""><figcaption></figcaption></figure>

<figure><img src="https://1040484064-files.gitbook.io/~/files/v0/b/gitbook-x-prod.appspot.com/o/spaces%2Fs45pRyTQeyYi0T0toKii%2Fuploads%2Fgit-blob-82a6027798d5b00b51c6b136e4b6b3c1c97ac4ce%2Fundefined-14.png?alt=media" alt=""><figcaption><p>▲ Top [Render shot] → run rendering → realistic image complete</p></figcaption></figure>

<figure><img src="https://1040484064-files.gitbook.io/~/files/v0/b/gitbook-x-prod.appspot.com/o/spaces%2Fs45pRyTQeyYi0T0toKii%2Fuploads%2Fgit-blob-9d8a17d02fd9c49877adb5ad350119abd68cd6cb%2Fundefined-15.png?alt=media" alt=""><figcaption><p>▲ [Gallery] — View completed images together</p></figcaption></figure>

### 9. Real-time quotes & customer connection

It doesn't stop at showing; you can hand over a quote on the spot.

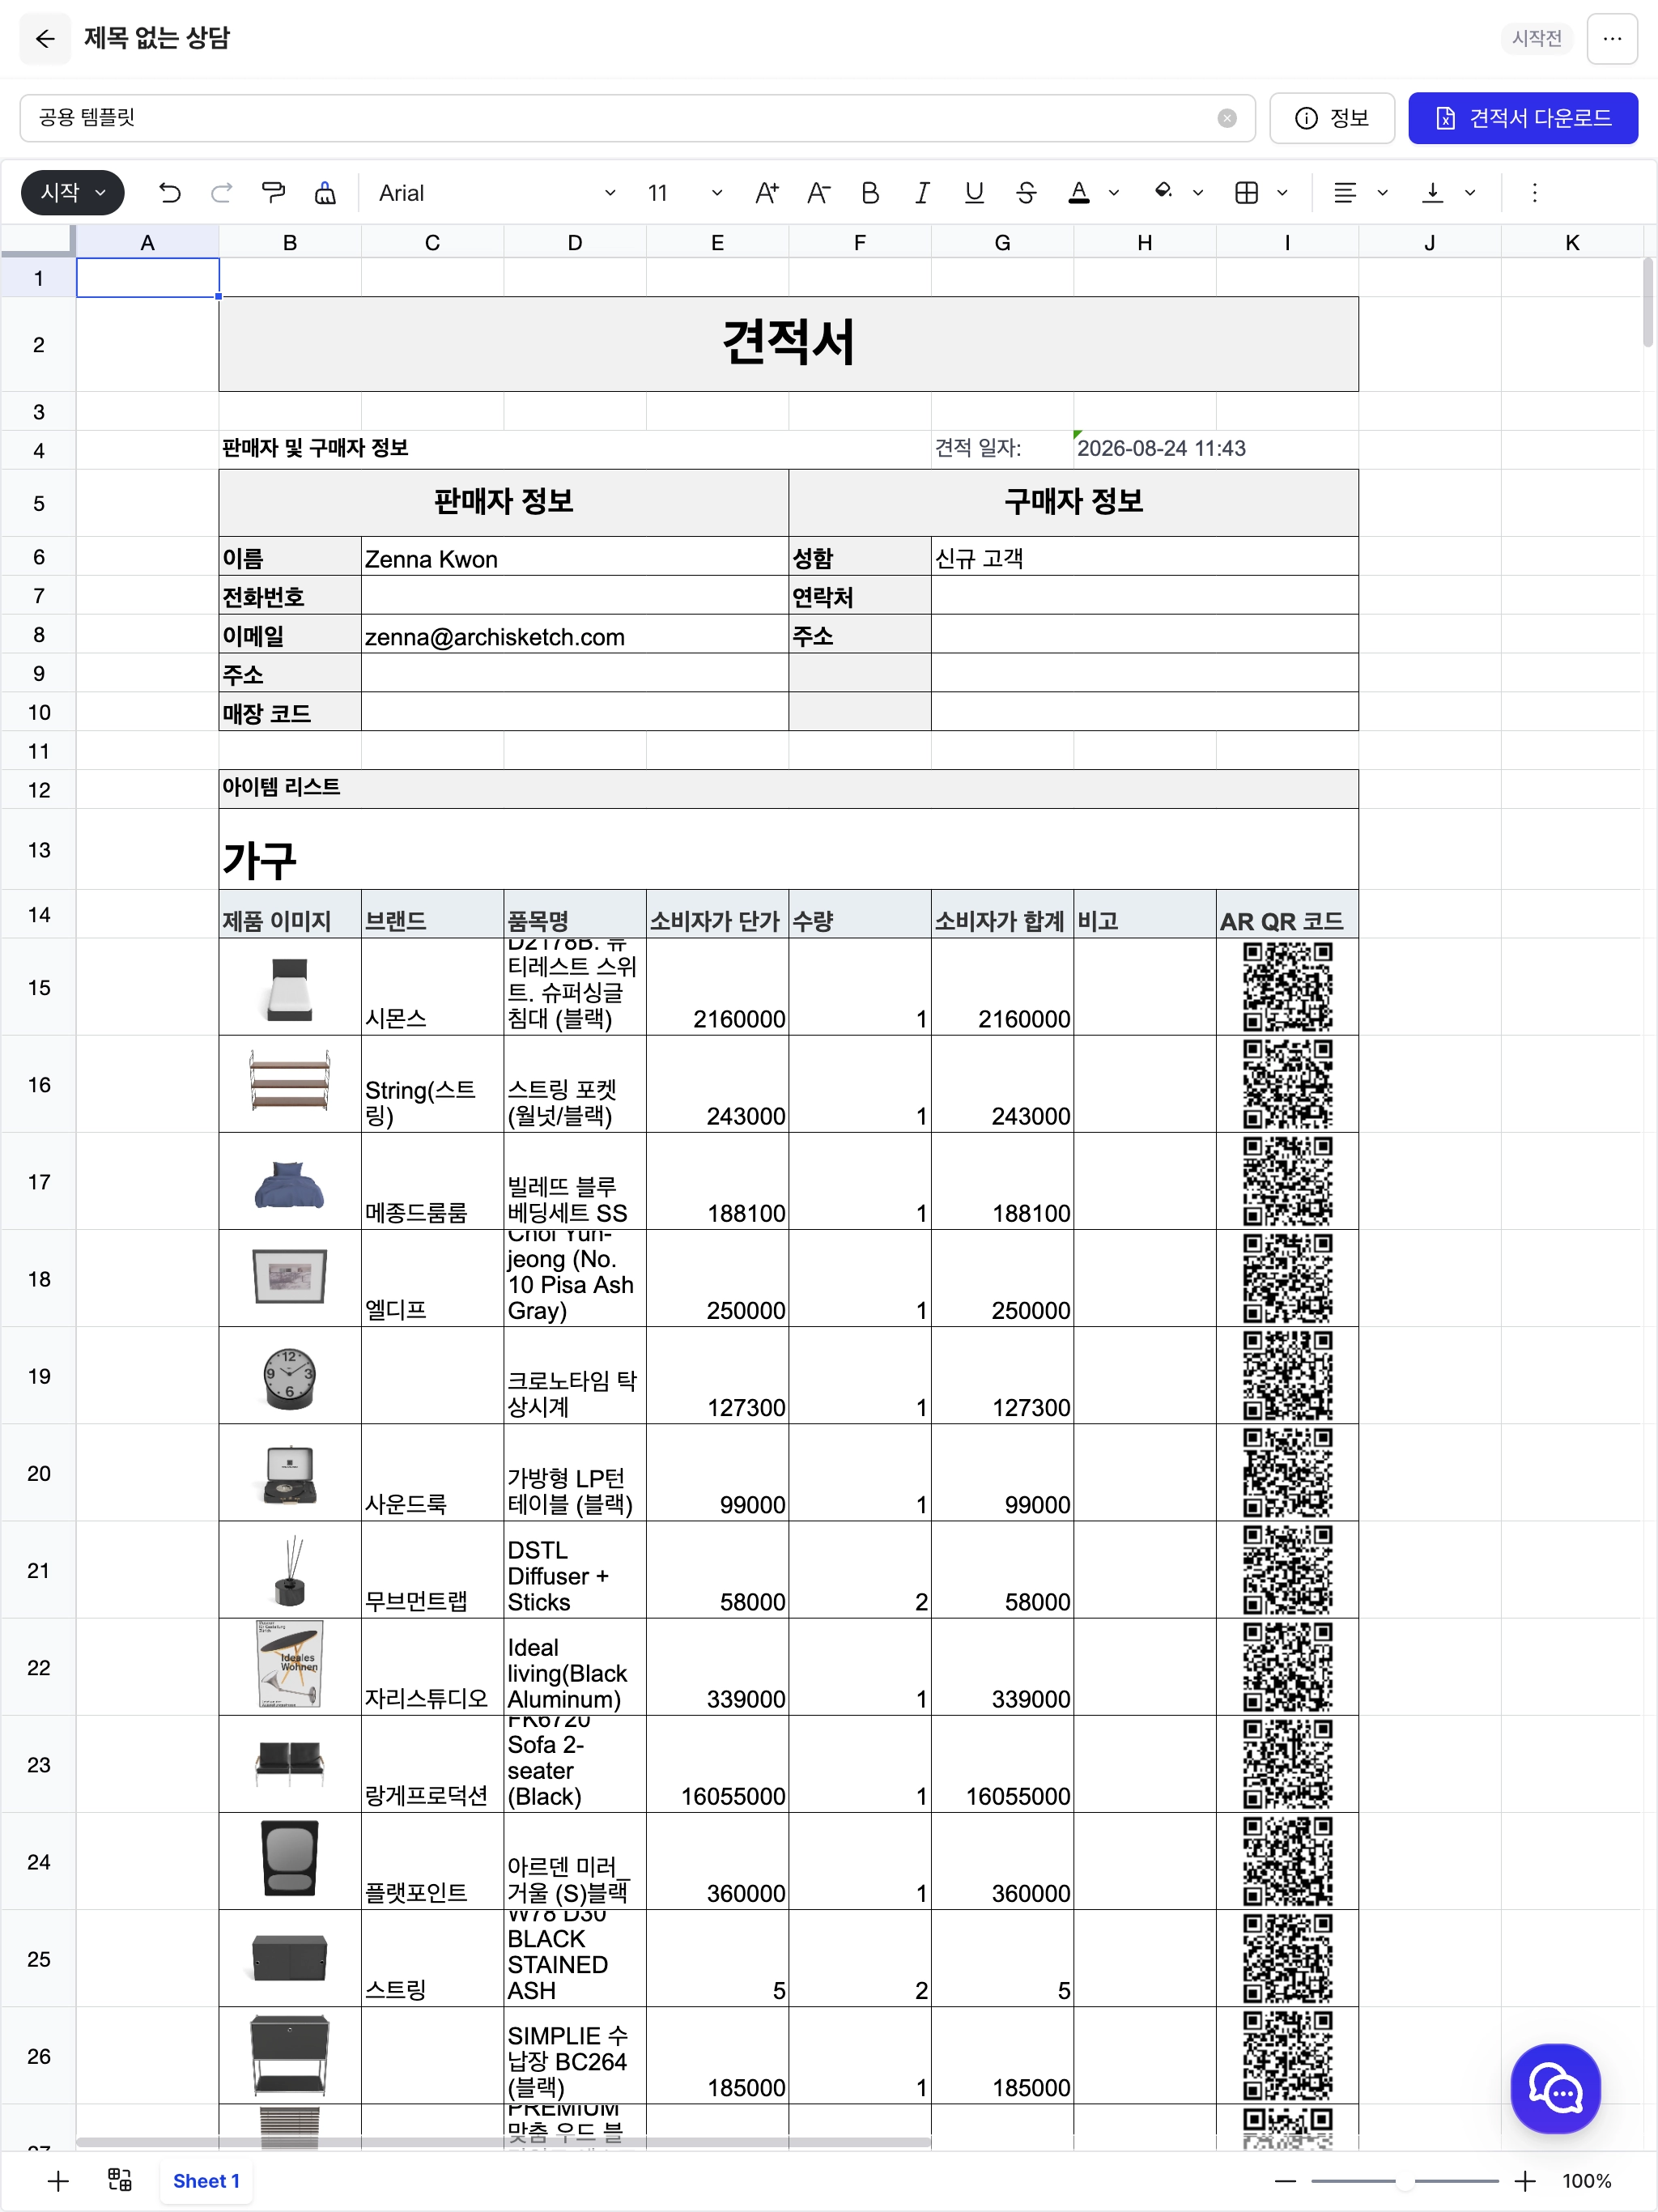
* Top **Real-time quote**the same as on PC **Excel-style quote**can be checked and edited.
* At the top of the quote **search for and connect a customer**and the seller/buyer information (name, phone, address) is automatically filled in.
* Top right **\[Download quote]**&#x79;ou can export it as Excel, CSV, or XML files.

<figure><img src="https://1040484064-files.gitbook.io/~/files/v0/b/gitbook-x-prod.appspot.com/o/spaces%2Fs45pRyTQeyYi0T0toKii%2Fuploads%2Fgit-blob-e2c7e59c8b0c34d9ef60568af76a4d64be27b671%2Fundefined-16.png?alt=media" alt=""><figcaption><p>▲ Real-time quote (Excel-style) — check and edit items, quantities, and amounts; export with [Download quote]</p></figcaption></figure>

***

Now, one tablet is enough. Without a heavy laptop, you can draw floor plans, place furniture, and even render with your fingertips — you can use everything in Archisketch just as it is.

Even if it's your first time, follow the steps above just once and you'll get the hang of it quickly.

Now it's time to make something yourself. Enjoy using it!


---

# Agent Instructions
This documentation is published with GitBook. GitBook is the documentation platform designed so that both humans and AI agents can read, navigate, and reason over technical content effectively. Learn more at gitbook.com.

## Querying This Documentation
If you need additional information that is not directly available in this page, you can query the documentation dynamically by asking a question.

Perform an HTTP GET request on the current page URL with the `ask` query parameter, and the optional `goal` query parameter:

```
GET https://docs.archisketch.com/guide/user-en/get-started/undefined.md?ask=<question>&goal=<endgoal>
```

`ask` is the immediate question: it should be specific, self-contained, and written in natural language.
`goal` is optional and describes the broader end goal you are ultimately trying to accomplish on behalf of the user. GitBook uses it to tailor the answer towards what is most useful for that goal.

The response will contain a direct answer to the question and relevant excerpts and sources from the documentation.

Use this mechanism when the answer is not explicitly present in the current page, you need clarification or additional context, or you want to retrieve related documentation sections.