> For the complete documentation index, see [llms.txt](https://docs.archisketch.com/llms.txt). Markdown versions of documentation pages are available by appending `.md` to page URLs; this page is available as [Markdown](https://docs.archisketch.com/guide/user-en/expert-feature/personal-library.md).
# Personal library
The Personal Library is a feature that lets you upload 3D modeling files or finish material sources you personally own and use them in the Archisketch editor.\
Only you can view these files, and other users cannot use them.
{% hint style="warning" %}
This feature is available to paid Archisketch customers.
{% endhint %}
## Furniture Upload
{% stepper %}
{% step %}
### Select File
Click \[Personal Library → Furniture Upload] to select a file.

* Uploadable file formats: SKP, ZIP (OBJ, GLTF)
* SKP version: 2023 or earlier
* Size limit: 100MB or less
{% hint style="warning" %}
However, even files under 100MB may not be uploadable, or errors may occur in the editor if the modeling file has too many meshes.\
If an error occurs during upload, please contact Archisketch.
{% endhint %}
{% endstep %}
{% step %}
### Attribute Settings
You can edit the name or specify attributes for product placement.
1. Edit Name
1. You can edit the product name.
2. Product Placement
1. You can specify attributes according to where the product will be placed. [Learn usage examples →](/guide/user-en/arranging-furniture/furniture-placement.md)
1. Products placed on the floor: rugs
2. Products standing on the floor: chairs, tables
3. Products attached to the ceiling: ceiling lights, ceiling fans
4. Products attached to walls: curtains, frames
3. Additional Upload
1. You can select and upload other products additionally. (Multiple selections available)

{% endstep %}
{% step %}
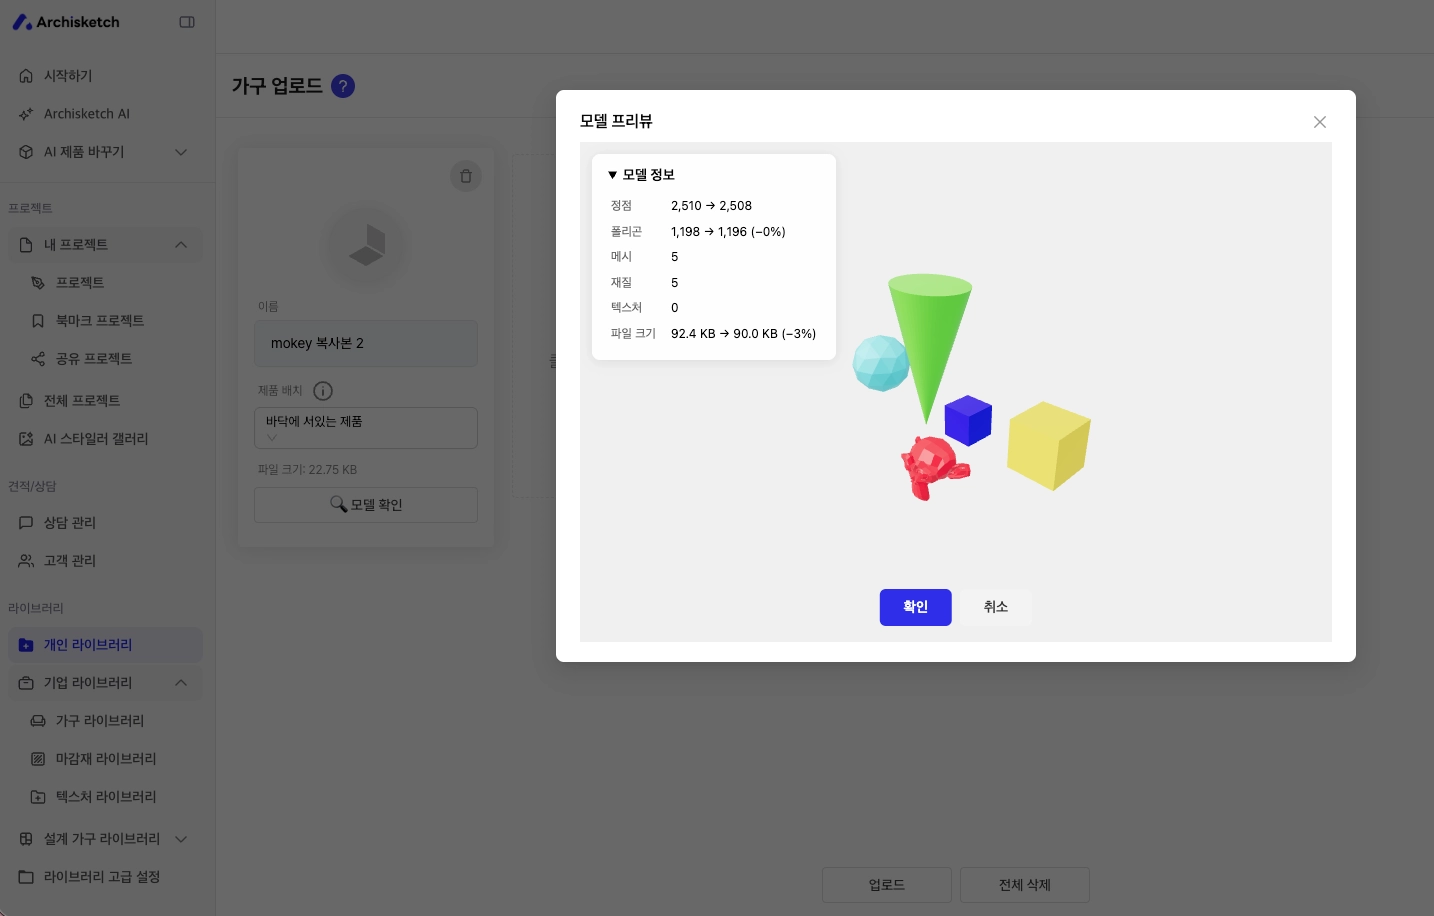
### Upload Review Viewer
Before registering a 3D furniture model, you can preview the model through the review viewer.\
By checking for any issues with the model before registration, you can prevent problems in advance and upload it stably.
{% endstep %}
{% step %}
### Upload
When you click the \[Upload] button, product upload begins.\
The upload proceeds according to the requested information, and it takes some time until the final upload is complete.
{% hint style="warning" %}
Like Render Shot, personal library uploads are processed sequentially through a cloud server, so the time may vary depending on server conditions.
{% endhint %}

* Go Back
* It will take you to the main page of the Personal Library, where you can check products currently being uploaded.
* Change Material
* You can enter \[Effector] to edit the material or change the size.
* This is not required, and you can change the material at any time even after the final upload is complete.
* Additional Upload
* You can continue uploading additional products.
{% endstep %}
{% endstepper %}
### Edit Product Information
Click View Product in the Personal Library to go to the detail page.\
Here you can edit the product name, purchase link, price, and more.

### Edit Modeling Material
* Enter \[Check 3D Modeling] → \[Effector].
* Click the product you want to edit, then select \[Material] in the right panel.
* Edit the material as desired.
* Click \[Save] to save the changes.
* Saving the product may take some time.

## Finish Material Upload
{% stepper %}
{% step %}
### Select File
Click Personal Library > Finish Material Upload.
* Drag the file to upload it
* File size limit: 5MB or less
* Uploadable files: JPG, PNG

{% endstep %}
{% step %}
### Attribute Settings

Name
* Specify the product name.
Finish Material Size (Repeat Size)
* Set the repeat size of the texture or finish material. This value determines how the finish material will repeat.
Bumpy Value (Roughness Value)
* Set the roughness of the surface. The closer the value is to 10, the rougher and stronger the surface will appear.
Glossy Value (Gloss Value)
* Set the glossiness of the surface. The closer the value is to 10, the stronger the gloss and the greater the reflection of light.
{% endstep %}
{% step %}
### Upload
Please click the \[Submit] button. Once you click the button, the upload is completed immediately and you are taken to the main screen of the Wallpaper/Finish Material tab.

{% endstep %}
{% endstepper %}
## Frequently Asked Questions
#### Where can I check uploaded products in the editor?
Uploaded Personal Library furniture can be checked in the editor's left tab via \[My Page → Upload].
#### I uploaded it, but it doesn't appear in the editor.
* It may take up to 10 minutes after upload to appear
* After the upload is complete, syncing between the dashboard and the editor may take up to 10 minutes.
* Please refresh and check again after 10 minutes.
* Check Product Information
* Please check whether the product is set to 'Hide in Editor' status.
* Verification path: Dashboard → Personal Library → Product Detail Page → 'Editor Status'
* What if the product still doesn't appear?
* If the product still doesn't appear even after checking both of the above, please contact customer support (ChannelTalk).
---
# Agent Instructions
This documentation is published with GitBook. GitBook is the documentation platform designed so that both humans and AI agents can read, navigate, and reason over technical content effectively. Learn more at gitbook.com.
## Querying This Documentation
If you need additional information that is not directly available in this page, you can query the documentation by asking a question.
Perform an HTTP GET request on the following URL with the `ask` and `goal` query parameters:
```
GET https://docs.archisketch.com/guide/user-en/expert-feature/personal-library.md?ask=&goal=
```
`ask` is the immediate question: it should be specific, self-contained, and written in natural language.
`goal` is what the user is ultimately trying to achieve, the reason they need the answer. Sharing it helps GitBook give you a better, more relevant answer. A goal is most helpful when it describes the outcome the user wants rather than restating the question. For example, with `ask=how do I create an API token`, a goal like `automate deployments from our CI pipeline` lets GitBook tailor the answer to that use case.
The response will contain a direct answer to the question and relevant excerpts and sources from the documentation.
Use this mechanism when the answer is not explicitly present in the current page, you need clarification or additional context, or you want to retrieve related documentation sections.