> For the complete documentation index, see [llms.txt](https://docs.archisketch.com/llms.txt). Markdown versions of documentation pages are available by appending `.md` to page URLs; this page is available as [Markdown](https://docs.archisketch.com/guide/enterprise-en/manage-finishing/upload-finishing.md).

# Finish material upload

In addition to the built-in finishes, you can upload finish material images you own and use them in your project.

## Step 1. Upload file

**Path:** Dashboard > Company Library > Products > Finishes > Upload

1. **'Upload' button**click.

![](/files/a4c275264bb069f7b08d5c90ddfa1f03639c637b)

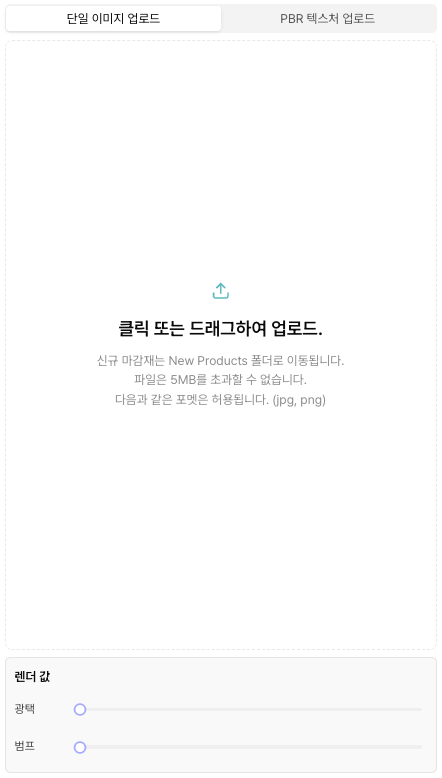
2. Prepared finish material **1 image file**upload it.

   * Supports 'click on screen' or 'drag and drop'
   * **Supported formats:** JPG, PNG
   * **Size limit:** 5MB or less

   <div data-with-frame="true"><figure><img src="/files/5d463222c62ee60880d1cc19135592c4659d46c8" alt=""><figcaption></figcaption></figure></div>

## Single image upload vs PBR texture upload

<table><thead><tr><th width="127.29296875">Item</th><th width="280.7109375">General upload</th><th>Expert upload</th></tr></thead><tbody><tr><td>Number of uploaded maps</td><td>1 (BaseColor)</td><td>Up to 5 (Albedo, Normal, Roughness, Metalness, Height)</td></tr><tr><td>Automatic correction feature</td><td>Provided (Roughness, Normal automatically generated)</td><td>Not provided – user uploads directly</td></tr><tr><td>Output quality</td><td>Basic level</td><td>High-quality PBR rendering possible</td></tr><tr><td>Recommended for</td><td>General users</td><td>3D professionals and designers</td></tr></tbody></table>

## Step 2. Set attribute values

After uploading an image, you will be taken to the attribute settings screen.

### Product Information - Finishes

{% tabs %}
{% tab title="Single image upload" %}

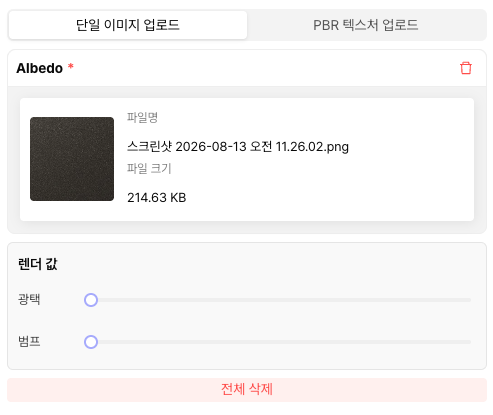
<figure><img src="/files/2c4707bf24f6d1463ccdd675ab2f0a13f02132c8" alt=""><figcaption></figcaption></figure>

**Bump**

* of the surface **degree of unevenness**set it.
  * `1` = flatness
  * `10` = the surface is **more bumpy and rough** expressed

**Gloss**

* of the surface **degree of gloss**set it.
  * `1` = no gloss
  * `10` = very glossy
    {% endtab %}

{% tab title="PBR texture upload" %}

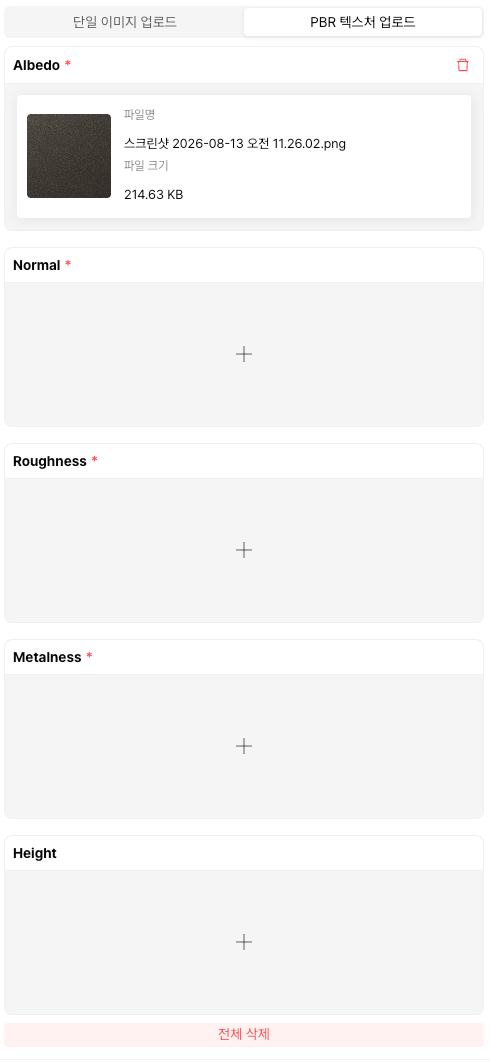
<figure><img src="/files/e031790f02a602f0cb321f9f454eff1d0fc59323" alt=""><figcaption></figcaption></figure>

* **The first uploaded image is Albedo (BaseColor)** and is uploaded as a map.
* **Supported file formats**: `.jpg`, `.png`
* **File size limit**: **Under 5MB**
* **File naming rules**: To clearly indicate the purpose of each map, for example: `materialname_albedo.png` we recommend using this format.

### Albedo (BaseColor)

* **Role**: Represents the base color of the surface.
* **Feature**: Pure color information without lighting or shadow information

### Normal

* **Role**: Controls the direction of light reflection to express detailed surface texture
* **Feature**: A blue/purple-toned map using RGB channels

### Roughness

* **Role**: Controls surface roughness and reflectivity
* **Feature**: A grayscale map from white (rough) to black (smooth)

### Metalness

* **Role**: Controls whether the material is metallic
* **Feature**: A black-and-white map usually represented as 0 or 1

### Height

* **Role**: Expresses surface height information to emphasize a sense of depth
* **Feature**: A grayscale map (more realistic when used together with a Normal map)

{% hint style="warning" %}
All maps **tiling (Seamless Texture)** must be applied.
{% endhint %}

### **Map creation and extraction methods**

#### Recommended tools

* Adobe Substance Painter
* Adobe Substance Designer

#### Notes when creating

* All maps must have tiling applied; non-tiling maps may cause unexpected rendering results.
  {% endtab %}
  {% endtabs %}

### **Product Information - Basic Info**

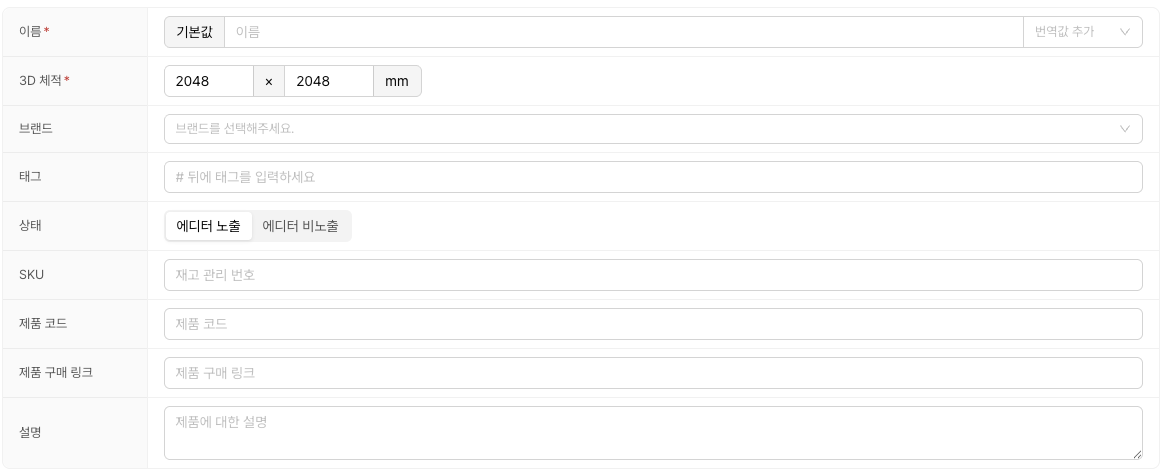
<div data-with-frame="true"><figure><img src="/files/03e65a0e5c2219048d687eb4242157ff6ce2f11f" alt=""><figcaption></figcaption></figure></div>

**Name**

* Enter the product name to be displayed in the editor.

**3D Dimensions**

* Please enter the image size.
* The set size will be applied to the editor as is.

### **Sales information**

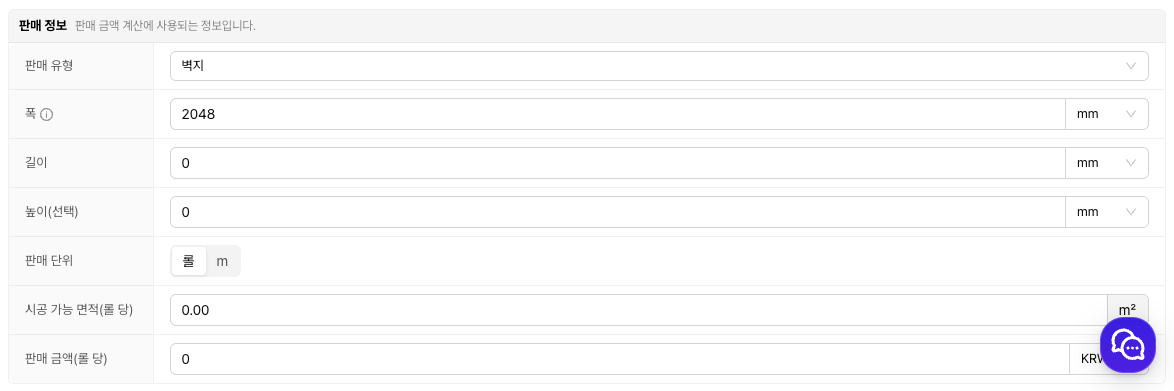
<div data-with-frame="true"><figure><img src="/files/3c0ab472dc9a04dc62af4b62fef06f3ec403d295" alt=""><figcaption></figcaption></figure></div>

If needed, enter commercial information as well. By adding the sales price, sales unit, applicable (installation) area, and more, you can use it right away for quotes and calculations.

{% hint style="info" %}
Pro tip — If you enter the sales price, unit, and applicable area accurately when first uploading, the area-based amount will be automatically calculated later in the quotation, reducing your workload.
{% endhint %}

If all other required information has been entered, **Upload** please press the button.

Completed submissions are `Finishes > Unclassified Products`saved as.

## Step 3. Move to category

Items in 'Unclassified Products' **are not displayed in the editor.**

Please be sure to set a category. **The category setup method is the same as for furniture products**.


---

# Agent Instructions
This documentation is published with GitBook. GitBook is the documentation platform designed so that both humans and AI agents can read, navigate, and reason over technical content effectively. Learn more at gitbook.com.

## Querying This Documentation
If you need additional information that is not directly available in this page, you can query the documentation dynamically by asking a question.

Perform an HTTP GET request on the current page URL with the `ask` query parameter, and the optional `goal` query parameter:

```
GET https://docs.archisketch.com/guide/enterprise-en/manage-finishing/upload-finishing.md?ask=<question>&goal=<endgoal>
```

`ask` is the immediate question: it should be specific, self-contained, and written in natural language.
`goal` is optional and describes the broader end goal you are ultimately trying to accomplish on behalf of the user. GitBook uses it to tailor the answer towards what is most useful for that goal.

The response will contain a direct answer to the question and relevant excerpts and sources from the documentation.

Use this mechanism when the answer is not explicitly present in the current page, you need clarification or additional context, or you want to retrieve related documentation sections.